
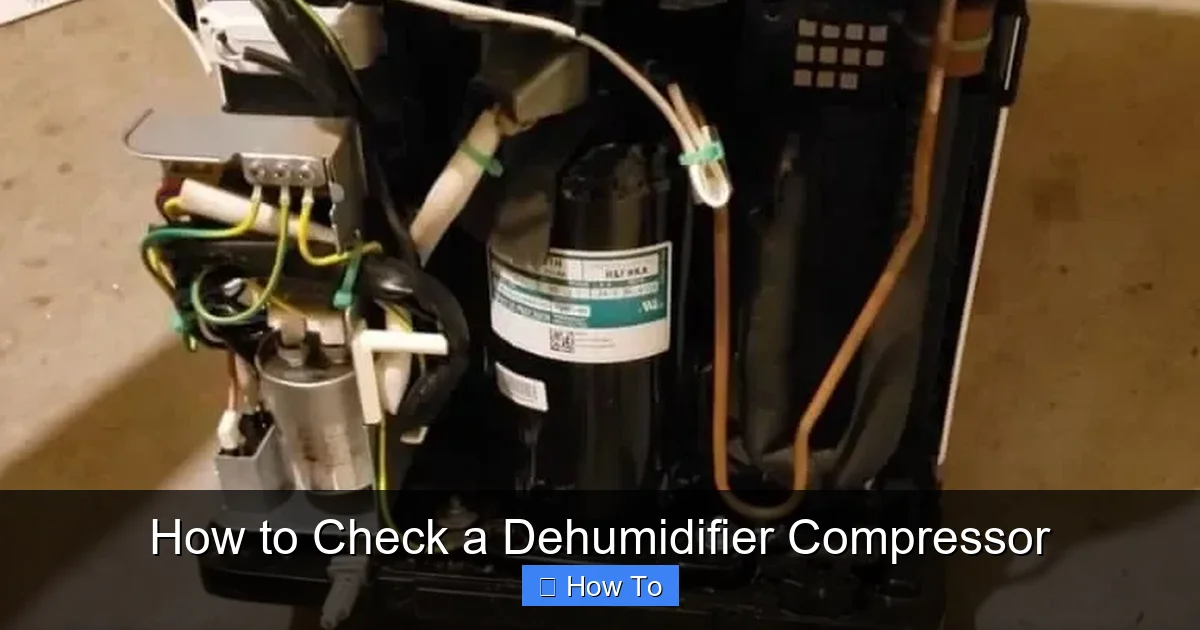
This guide walks you through how to check a dehumidifier compressor safely and effectively. You’ll learn to identify common issues, test components, and determine if repairs or replacements are needed.
Quick Answers to Common Questions
Should I test the compressor while it’s running?
No. Always test with the unit unplugged and capacitors discharged. Live testing increases shock risk and can damage your multimeter.
Can a bad capacitor mimic compressor failure?
Yes. A weak or dead capacitor prevents the compressor from starting, making it seem faulty. Always test the capacitor first.
Is it safe to replace the compressor myself?
Generally no. Compressor replacement involves refrigerant handling, which requires EPA certification. Leave it to professionals.
How often should I clean my dehumidifier?
Clean the filter monthly and the coils at least once a year. More frequent cleaning may be needed in dusty environments.
Why is my compressor overheating?
Common causes include dirty coils, blocked airflow, low refrigerant, or a failing overload protector. Clean and inspect regularly.
How to Check a Dehumidifier Compressor: A Complete Step-by-Step Guide
If your dehumidifier isn’t removing moisture from the air like it used to, the compressor might be the culprit. The compressor is the heart of your dehumidifier—it circulates refrigerant through the system, enabling the unit to cool the coils and extract water from the air. When it fails, the entire system can shut down.
In this guide, you’ll learn how to check a dehumidifier compressor like a pro. We’ll walk you through safety precautions, visual inspections, electrical testing, and troubleshooting tips. Whether you’re a DIY enthusiast or just want to understand what’s going on inside your appliance, this guide will help you diagnose compressor issues accurately and decide whether to repair or replace your unit.
By the end, you’ll know how to identify common compressor problems, use a multimeter safely, and take steps to prevent future failures. Let’s get started.
Why the Compressor Matters in a Dehumidifier
Visual guide about How to Check a Dehumidifier Compressor
Image source: i.pinimg.com
Before diving into the inspection process, it’s important to understand what the compressor does. In a refrigerant-based dehumidifier, the compressor pressurizes the refrigerant gas, raising its temperature. This hot, high-pressure gas then flows through the condenser coils, where it cools and turns into a liquid. The liquid refrigerant moves to the evaporator coils, where it expands and cools dramatically, causing moisture in the air to condense on the coils.
Without a working compressor, this cycle can’t happen. The coils won’t get cold, and no water will be collected. So if your dehumidifier is running but not dehumidifying, the compressor is one of the first components to check.
Common signs of compressor trouble include:
– The unit runs but doesn’t remove moisture
– Loud humming or clicking noises
– The compressor gets extremely hot
– The dehumidifier trips the circuit breaker
– Frost buildup on the coils (indicating refrigerant issues)
Now that you know why the compressor is so critical, let’s move on to how to inspect it.
Safety First: Preparing to Check the Compressor
Working with electrical components can be dangerous. Before you touch anything inside your dehumidifier, follow these safety steps:
Unplug the Unit
Always disconnect the dehumidifier from the power outlet. Don’t just turn it off—unplug it completely. This prevents accidental shocks or short circuits.
Allow Time to Cool
If the dehumidifier has been running, let it sit for at least 30 minutes. Compressors and capacitors can retain heat and electrical charge even after being turned off.
Discharge the Capacitor
The start capacitor stores electricity and can deliver a dangerous shock even when unplugged. To discharge it:
– Locate the capacitor (usually a small, cylindrical component near the compressor)
– Use an insulated screwdriver with a rubber handle
– Touch the metal shaft to both terminals simultaneously (one at a time if it’s a dual-run capacitor)
– You may hear a small pop or see a spark—this is normal
Never skip this step. Capacitors can hold a charge for days.
Wear Protective Gear
Use safety glasses and insulated gloves. Even with precautions, accidental contact with live components can happen.
Work in a Dry, Well-Lit Area
Moisture increases the risk of electrical shock. Choose a clean, dry workspace with good lighting so you can see small parts clearly.
Once you’ve taken these precautions, you’re ready to begin the inspection.
Step 1: Access the Compressor
To check the compressor, you’ll need to open the dehumidifier’s outer casing. Here’s how:
Remove the Outer Panels
Most dehumidifiers have side or rear panels held in place by screws. Use a Phillips or flathead screwdriver to remove them. Keep the screws in a small container so you don’t lose them.
Locate the Compressor
The compressor is typically a cylindrical or oval metal component, often painted black or silver. It’s usually mounted near the bottom of the unit and connected to copper refrigerant lines. It may have wires attached to terminals labeled “S” (start), “R” (run), and “C” (common).
Identify Connected Components
Note the start relay, overload protector, and capacitor. These parts work with the compressor and can affect its performance. We’ll test them later.
Take Photos or Notes
Before disconnecting anything, take pictures or sketch the wiring layout. This will help you reconnect everything correctly later.
Now that you’ve accessed the compressor, let’s begin the inspection.
Step 2: Visual Inspection of the Compressor
Start with a thorough visual check. Look for obvious signs of damage.
Check for Physical Damage
Inspect the compressor housing for:
– Dents, cracks, or rust
– Oil leaks (a sign of refrigerant leakage)
– Burn marks or melted insulation on wires
If you see oil around the compressor or refrigerant lines, the compressor may have failed internally. Oil leaks often mean the seals are broken.
Listen for Unusual Sounds
Plug the unit back in briefly (only if you’ve discharged the capacitor and are wearing gloves). Turn it on and listen:
– A loud hum or buzz without the compressor starting suggests a seized motor or faulty capacitor
– Clicking noises may indicate a failing start relay
– A high-pitched whine could mean internal wear
If the compressor starts and runs smoothly, it may not be the problem. But if it struggles or doesn’t start, proceed to electrical testing.
Feel the Temperature
After running for 10–15 minutes, carefully touch the compressor (use gloves). It should be warm, not hot. If it’s too hot to touch, it may be overheating due to:
– Dirty coils restricting airflow
– Low refrigerant levels
– Internal motor damage
Overheating can trigger the thermal overload protector, which cuts power to prevent damage.
Step 3: Test the Start Relay and Capacitor
Before blaming the compressor, rule out other components. The start relay and capacitor are common failure points.
Locate the Start Relay
This small plastic or metal device plugs into the compressor terminals. It helps deliver the initial burst of power to start the motor.
Remove and Inspect the Relay
Unplug it from the compressor. Look for:
– Burn marks or melted plastic
– A burnt smell
– Loose or corroded contacts
If it looks damaged, replace it. Relays are inexpensive and easy to swap.
Test the Capacitor
Use a multimeter with a capacitance setting:
– Set the meter to measure microfarads (µF)
– Touch the probes to the capacitor terminals
– Compare the reading to the value printed on the capacitor
If the reading is significantly lower than labeled (e.g., labeled 15µF but reads 5µF), the capacitor is weak or dead.
Alternatively, use the resistance (ohms) setting:
– Set the meter to ohms (Ω)
– Touch the probes to the terminals
– A healthy capacitor will show a brief resistance spike, then return to infinity
– No change or a constant low reading means the capacitor is shorted or open
Replace faulty capacitors before testing the compressor.
Step 4: Test the Compressor with a Multimeter
Now it’s time to test the compressor itself. You’ll need a digital multimeter set to ohms (resistance).
Disconnect the Wires
Carefully remove the wires from the compressor terminals (S, R, C). Label them if needed.
Test for Continuity
Set your multimeter to the lowest ohms setting (usually 200Ω).
Test between each pair of terminals:
– S to R
– S to C
– R to C
A healthy compressor should show continuity (low resistance, usually 1–30 ohms) between all three pairs. If any pair shows “OL” (open loop) or infinite resistance, the compressor has an open winding and is likely dead.
Test for Shorts to Ground
Set the meter to ohms. Touch one probe to a terminal (S, R, or C) and the other to the compressor’s metal casing.
There should be NO continuity (infinite resistance). If the meter beeps or shows low resistance, the windings are shorted to ground—another sign of failure.
Interpret the Results
– **Good compressor:** Continuity between all terminals, no ground shorts
– **Open winding:** No continuity between one or more terminal pairs
– **Short to ground:** Continuity between any terminal and the casing
– **Shorted windings:** Very low or zero resistance between terminals (rare)
If the compressor fails any of these tests, it needs replacement.
Step 5: Check the Overload Protector
The overload protector is a thermal switch that cuts power if the compressor overheats. It’s often built into the compressor or mounted nearby.
Locate the Protector
It’s usually a small disc or button near the compressor terminals.
Test for Continuity
Use your multimeter to check for continuity across the protector’s terminals. If it’s open (no continuity), it may have tripped due to overheating.
Reset or Replace
Some overload protectors reset automatically when cooled. Wait 30 minutes and test again. If it remains open, replace it.
A faulty overload protector can prevent the compressor from starting, even if the compressor itself is fine.
Step 6: Reassemble and Test the Unit
Once you’ve completed all tests and replaced any faulty parts:
Reconnect All Wires
Refer to your photos or notes. Reattach wires to the correct terminals (S, R, C).
Reinstall the Panels
Replace the outer casing and secure it with screws.
Plug In and Test
Turn on the dehumidifier and monitor it for 15–20 minutes. Listen for smooth operation and check if moisture is being collected.
If the compressor starts and runs quietly, and the unit dehumidifies, you’ve successfully diagnosed and fixed the issue.
Troubleshooting Common Compressor Issues
Even with testing, some problems aren’t immediately obvious. Here’s how to handle common scenarios:
Compressor Hums But Doesn’t Start
This usually means the start relay or capacitor is weak. Replace both and test again.
Compressor Starts Then Shuts Off
Could be an overheating issue. Check for dirty coils, blocked airflow, or a faulty overload protector.
No Power to the Compressor
Test the control board, thermostat, and power cord. The issue may not be the compressor at all.
Frost on the Coils
Indicates low refrigerant or a problem with the defrost cycle. A failing compressor can cause this, but so can a clogged filter or dirty coils.
Strange Odors or Smoke
Immediately unplug the unit. This could signal burnt windings or electrical fire. Do not attempt to restart.
When to Replace the Compressor
Compressors are expensive and difficult to replace. In most cases, it’s more cost-effective to replace the entire dehumidifier. Consider replacement if:
– The compressor shows no continuity or ground shorts
– There’s an oil leak
– The unit is over 5–7 years old
– Repair costs exceed 50% of a new unit’s price
However, if you have a high-end or commercial-grade dehumidifier, compressor replacement may be worthwhile. Consult a certified technician for professional repair.
Preventing Future Compressor Problems
Regular maintenance can extend your compressor’s life and prevent failures:
Clean the Air Filter Monthly
A dirty filter restricts airflow, forcing the compressor to work harder.
Clean the Coils Annually
Use a soft brush or vacuum to remove dust from the evaporator and condenser coils.
Ensure Proper Ventilation
Keep the dehumidifier away from walls and furniture. Allow at least 6–12 inches of clearance on all sides.
Avoid Overuse
Don’t run the unit continuously in high-humidity conditions. Use a humidistat to control runtime.
Check Refrigerant Levels (Professionally)
Low refrigerant can damage the compressor. Only a licensed technician should handle refrigerant.
Inspect Wiring and Connections
Loose or corroded wires can cause intermittent power issues.
Conclusion
Checking a dehumidifier compressor may seem intimidating, but with the right tools and precautions, it’s a manageable DIY task. By following this guide, you’ve learned how to safely access the compressor, perform visual and electrical inspections, test related components, and interpret the results.
Remember: safety comes first. Always unplug the unit, discharge the capacitor, and wear protective gear. If you’re unsure at any point, consult a professional.
While compressor failure often means replacing the dehumidifier, identifying the issue early can save you money and prevent further damage. Regular maintenance is your best defense against future problems.
Now that you know how to check a dehumidifier compressor, you can keep your home comfortable and your appliance running efficiently for years to come.