
Adding refrigerant to a dehumidifier is a technical task that requires caution, proper tools, and knowledge of HVAC systems. This guide walks you through the process safely, from diagnosing low refrigerant to recharging the system and testing performance.
Quick Answers to Common Questions
Can I use car AC refrigerant in my dehumidifier?
No. Dehumidifiers use specific refrigerants like R-134a or R-410A. Car AC systems often use different types, and mixing them can damage your unit or create safety hazards.
How often should I add refrigerant to my dehumidifier?
Refrigerant should never need regular top-offs. If your dehumidifier is low, it likely has a leak that needs repair. Recharging without fixing the leak is only a temporary fix.
Is it safe to recharge a dehumidifier myself?
It can be, if you have the right tools, knowledge, and safety precautions. However, handling refrigerants requires care—improper use can cause injury or environmental harm. When in doubt, call a pro.
What if my dehumidifier doesn’t have service ports?
Some units have sealed systems not designed for user service. In these cases, recharging isn’t possible without specialized equipment. Consult the manual or a technician.
Can low refrigerant cause the dehumidifier to overheat?
Yes. Low refrigerant reduces cooling efficiency, causing the compressor to work harder and potentially overheat. This can lead to permanent damage if not addressed.
How to Add Refrigerant to Dehumidifier: A Complete Step-by-Step Guide
If your dehumidifier isn’t removing moisture from the air like it used to, you might be wondering if it needs more refrigerant. While low refrigerant levels can cause poor performance, they’re often a symptom of a larger issue—like a leak or faulty compressor. Before you grab a can of refrigerant and start spraying, it’s important to understand that adding refrigerant to a dehumidifier isn’t as simple as topping off your car’s AC.
In this comprehensive guide, you’ll learn how to safely and correctly add refrigerant to your dehumidifier. We’ll cover everything from diagnosing the real problem to gathering the right tools, performing the recharge, and troubleshooting common issues. Whether you’re a DIY enthusiast or just trying to save money on repairs, this guide will help you make informed decisions—and know when it’s time to call in a professional.
Understanding How Dehumidifiers Work
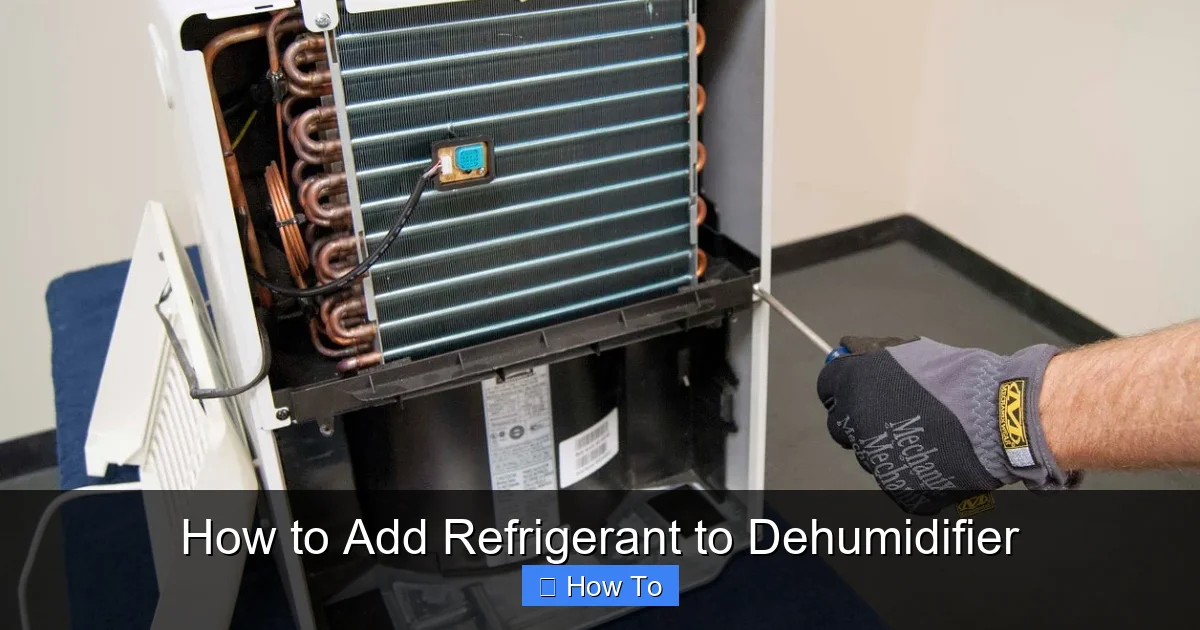
Before diving into the refrigerant recharge process, it’s helpful to understand how your dehumidifier operates. Most residential dehumidifiers use a refrigeration cycle similar to air conditioners and refrigerators. Here’s a quick breakdown:

Visual guide about How to Add Refrigerant to Dehumidifier
Image source: 5.imimg.com
- Air Intake: Humid air is drawn into the unit by a fan.
- Cooling Coils: The air passes over cold evaporator coils, causing moisture to condense into water droplets.
- Water Collection: The collected water drips into a tank or drains out through a hose.
- Reheating: The now-dry air passes over warm condenser coils and is released back into the room.
- Refrigerant Cycle: A compressor circulates refrigerant through the system, absorbing heat from the air and releasing it elsewhere.
The refrigerant is the lifeblood of this system. It absorbs heat from the incoming air and releases it as the air is reheated. If the refrigerant level drops—usually due to a leak—the system can’t cool the coils effectively, leading to reduced dehumidification and potential frost buildup.
Signs Your Dehumidifier Needs Refrigerant
Not every underperforming dehumidifier needs more refrigerant. In fact, low refrigerant is relatively rare and usually indicates a leak. Here are the most common signs that your unit may be low on refrigerant:
- Reduced Moisture Removal: The unit runs but collects very little water, even in humid conditions.
- Frost on Coils: Ice builds up on the evaporator coils, which can block airflow and damage components.
- Warm Air Output: The air coming out of the dehumidifier feels warm instead of slightly cooler.
- Short Cycling: The compressor turns on and off frequently without completing a full cycle.
- Hissing or Bubbling Sounds: These noises may indicate a refrigerant leak.
However, these symptoms can also be caused by other issues like clogged filters, dirty coils, or a failing compressor. That’s why proper diagnosis is critical before attempting to add refrigerant.
Tools and Materials You’ll Need
Recharging a dehumidifier isn’t a job for basic household tools. You’ll need specialized equipment to do it safely and effectively. Here’s what you’ll need:
- Manifold Gauge Set: Measures pressure in the low and high sides of the system.
- Vacuum Pump: Removes air and moisture from the refrigerant lines before recharging.
- Refrigerant Scale: Ensures you add the correct amount of refrigerant by weight.
- Refrigerant Canister: Must match the type used in your dehumidifier (usually R-134a or R-410A).
- Leak Detection Kit: Helps locate and confirm refrigerant leaks.
- Safety Gear: Gloves, safety goggles, and long sleeves to protect against cold burns and chemical exposure.
- Wrenches and Screwdrivers: For accessing the service ports and internal components.
- Service Manual: Check your dehumidifier’s manual for specific refrigerant type, charge amount, and service instructions.
Note: Some of these tools can be rented from HVAC supply stores if you don’t want to purchase them outright.
Step 1: Confirm the Problem Is Low Refrigerant
Before you start disassembling your dehumidifier, rule out simpler causes of poor performance. Many issues can mimic low refrigerant.
Check the Air Filter
A dirty air filter restricts airflow, reducing the unit’s ability to remove moisture. Turn off and unplug the dehumidifier, then remove and inspect the filter. If it’s clogged with dust or mold, clean or replace it. Wait 24 hours and test the unit again.
Inspect the Coils
Frost or dirt on the evaporator or condenser coils can impair heat exchange. Use a soft brush or vacuum to clean the coils. If frost persists after cleaning, it may indicate low refrigerant or a faulty defrost sensor.
Test the Compressor
The compressor is the heart of the refrigeration system. If it’s not running or making unusual noises, it may be faulty. Use a multimeter to check for continuity. If the compressor is dead, recharging refrigerant won’t fix the problem.
Look for Leaks
Refrigerant doesn’t “run out” on its own—it escapes through leaks. Use a leak detection spray or electronic leak detector around joints, seals, and the compressor. Bubbles or audible hissing indicate a leak. Common leak points include the Schrader valves, coil connections, and the compressor seal.
If you find a leak, it must be repaired before recharging. Small leaks can sometimes be fixed with sealants, but larger ones may require soldering or component replacement—tasks best left to professionals.
Step 2: Gather Information from the Service Label
Every dehumidifier has a service label or nameplate that provides critical information. Locate it—usually on the back or bottom of the unit—and note the following:
- Refrigerant Type: Common types include R-134a, R-410A, or R-22 (older models). Never use the wrong type.
- Charge Amount: Listed in ounces or grams (e.g., 12 oz of R-134a). This is the exact amount needed.
- Model and Serial Number: Useful if you need to contact the manufacturer or find a service manual online.
If the label is missing or unreadable, search online using your model number to find the specifications. Never guess the refrigerant type or charge amount—doing so can damage the system or create safety hazards.
Step 3: Prepare the Dehumidifier for Service
Safety is paramount when working with refrigeration systems. Follow these steps carefully:
Unplug the Unit
Always disconnect the dehumidifier from the power source before opening it. This prevents electrical shock and accidental startup.
Move to a Well-Ventilated Area
Work in a garage, basement, or outdoor space with good airflow. Refrigerants can displace oxygen or release harmful fumes if leaked.
Wear Protective Gear
Put on safety goggles, nitrile gloves, and long sleeves. Refrigerant can cause frostbite on contact with skin.
Access the Service Ports
Remove the outer casing using a screwdriver or wrench. Look for the service ports—usually labeled “low” and “high” pressure. The low-pressure port is where you’ll add refrigerant. It’s typically larger and located near the compressor.
Note: Some dehumidifiers have sealed systems that aren’t designed for user service. If you don’t see service ports, the unit may not be rechargeable, and you should consult a technician.
Step 4: Connect the Manifold Gauge Set
The manifold gauge set allows you to monitor pressure and control the flow of refrigerant. Here’s how to connect it:
Attach the Hoses
Connect the blue hose to the low-pressure service port and the red hose to the high-pressure port. The yellow hose connects to the refrigerant canister.
Open and Close Valves
Ensure all valves on the manifold gauge are closed before connecting. This prevents refrigerant from escaping.
Purge Air from Hoses
Open the valve on the refrigerant canister briefly to push a small amount of gas through the yellow hose, then close it. This removes air from the line and ensures accurate charging.
Check for Leaks
With the system off, open the low-side valve slightly and watch the gauge. If pressure drops over time, there’s still a leak that needs fixing.
Step 5: Evacuate the System with a Vacuum Pump
Before adding new refrigerant, you must remove air and moisture from the system. Air contains moisture and non-condensable gases that can reduce efficiency and damage components.
Connect the Vacuum Pump
Attach the vacuum pump to the yellow hose (center port) on the manifold gauge.
Open the Valves
Open both the low and high-side valves on the manifold gauge to allow the pump to pull a vacuum on the entire system.
Run the Pump
Turn on the vacuum pump and let it run for at least 30–60 minutes. Use a digital vacuum gauge if available—aim for a vacuum level of 500 microns or lower.
Monitor the Gauge
If the vacuum holds steady, the system is airtight. If it rises, there’s still a leak or moisture inside. Repeat the process or locate and fix the leak.
Close Valves and Disconnect Pump
Once the vacuum is achieved, close the valves on the manifold gauge and turn off the pump. Disconnect the pump but leave the gauges connected.
Step 6: Add Refrigerant to the Dehumidifier
Now it’s time to recharge the system. This must be done slowly and accurately to avoid overcharging.
Weigh the Refrigerant Canister
Place the refrigerant canister on the digital scale and zero it out. This ensures you add the exact amount specified on the service label.
Connect the Canister
Screw the canister into the yellow hose adapter. Make sure it’s upright to prevent liquid refrigerant from entering the system too quickly.
Open the Low-Side Valve
With the dehumidifier still off, slowly open the low-side valve on the manifold gauge. This allows refrigerant to flow into the system as a vapor.
Monitor the Scale and Gauge
Watch the scale to track how much refrigerant has been added. Also, monitor the low-pressure gauge—it should rise gradually. Do not exceed the recommended charge.
Add Refrigerant in Short Bursts
Add refrigerant in 1–2 oz increments, waiting a few minutes between each. This prevents flooding the compressor with liquid refrigerant, which can cause damage.
Stop When Full
Once the correct weight is reached, close the valve on the manifold gauge and the canister. Disconnect the hoses and replace the service port caps.
Step 7: Test the Dehumidifier
After recharging, it’s time to see if the fix worked.
Reassemble the Unit
Replace the outer casing and secure all screws. Make sure no wires or hoses are pinched.
Plug In and Turn On
Plug the dehumidifier back in and set it to the desired humidity level. Let it run for at least 30 minutes.
Check Performance
Monitor the water collection tank. You should see a noticeable increase in water output compared to before. Also, check that the air coming out is cool and the coils are free of frost.
Listen for Normal Operation
The compressor should run smoothly without unusual noises. If it cycles on and off frequently or makes grinding sounds, there may still be an issue.
Troubleshooting Common Issues
Even after recharging, your dehumidifier may not work perfectly. Here are some common problems and solutions:
Unit Still Not Removing Moisture
If performance hasn’t improved, the issue may not have been low refrigerant. Check the fan, filter, and coils again. Also, ensure the room is properly sealed—dehumidifiers work best in enclosed spaces.
Frost Builds Up Again
Persistent frost suggests a refrigerant leak, faulty defrost timer, or low ambient temperature. Run the unit in a warmer room (above 65°F) and check for leaks.
Compressor Won’t Start
A failed start capacitor or relay can prevent the compressor from running. Test these components with a multimeter and replace if necessary.
Refrigerant Smell or Hissing
These are signs of an active leak. Turn off the unit immediately and use a leak detector to locate the source. Do not operate the dehumidifier until the leak is repaired.
Overcharged System
Adding too much refrigerant can cause high pressure, reduced efficiency, and compressor damage. If the high-side pressure is excessively high, you may need to release some refrigerant—best done by a professional.
When to Call a Professional
While this guide empowers you to handle basic refrigerant recharging, some situations require expert help:
- You can’t locate or repair a refrigerant leak.
- The compressor is damaged or not running.
- You’re uncomfortable handling pressurized gases or electrical components.
- The dehumidifier is still under warranty—DIY repairs may void it.
- You don’t have the proper tools or training.
Certified HVAC technicians have the experience, tools, and certifications (like EPA 608) to safely handle refrigerants. They can also perform a full system diagnosis and ensure your dehumidifier operates at peak efficiency.
Preventing Future Refrigerant Issues
Once your dehumidifier is working properly, take steps to avoid future problems:
- Clean the Filter Monthly: A clean filter ensures proper airflow and reduces strain on the system.
- Clean Coils Annually: Use a coil cleaner or mild detergent to remove dirt and mold.
- Inspect for Leaks: Periodically check joints and seals for signs of oil or refrigerant residue.
- Use in Recommended Conditions: Most dehumidifiers work best between 65°F and 80°F. Avoid using them in very cold or dusty environments.
- Schedule Professional Maintenance: Have a technician inspect your unit every 2–3 years, especially if it’s used heavily.
Conclusion
Adding refrigerant to a dehumidifier is a complex but achievable task if you have the right tools, knowledge, and caution. While low refrigerant can cause performance issues, it’s often a sign of a leak or other underlying problem that must be addressed first. By following this step-by-step guide—diagnosing the issue, evacuating the system, and recharging accurately—you can restore your dehumidifier’s efficiency and extend its lifespan.
However, always prioritize safety and know your limits. If at any point you feel unsure, don’t hesitate to call a professional. Proper maintenance and timely repairs will keep your dehumidifier running smoothly for years to come, ensuring a healthier, more comfortable home environment.