
Discover how to build a dehumidifier using everyday materials like silica gel, fans, and containers. This step-by-step guide helps you create an effective, low-cost solution for controlling indoor humidity and improving air quality.
Quick Answers to Common Questions
Can I use table salt instead of silica gel?
No, table salt isn’t an effective desiccant. It can clump and even release moisture in humid conditions. Stick to silica gel or calcium chloride for best results.
How often should I recharge the silica gel?
It depends on humidity levels. Check the color if using indicating gel—recharge when it turns pink. In high humidity, this may be every few days.
Is it safe to leave the dehumidifier running overnight?
Yes, if it’s properly assembled and in a stable location. Passive units are very safe. Active models should be monitored initially, but are generally low-risk.
Can I build a dehumidifier without electricity?
Absolutely. The passive desiccant method uses no power at all—just airflow and moisture-absorbing materials. Perfect for off-grid or emergency use.
Will this work in a basement?
Yes, especially the active electric model. Basements are often damp, so a powered unit with a fan and cooler will be more effective than a passive one.
Introduction: Why Build Your Own Dehumidifier?
High humidity can cause mold, musty odors, and damage to furniture, electronics, and walls. While commercial dehumidifiers work well, they can be expensive—especially for small spaces or occasional use. That’s where building your own dehumidifier comes in. With a few simple tools and materials, you can create an effective, low-cost solution that fits your needs.
In this guide, you’ll learn how to build a dehumidifier using two main methods: a passive desiccant-based system and an active electric model. Whether you’re dealing with a damp basement, a humid closet, or just want better air quality, this DIY project is practical, educational, and eco-friendly. Plus, it gives you full control over size, power, and design.
By the end of this guide, you’ll understand how dehumidifiers work, what materials you need, and how to assemble and maintain your homemade unit safely and effectively.
Understanding How Dehumidifiers Work
Before building your own dehumidifier, it helps to know how they remove moisture from the air. There are two primary methods: condensation and desiccation.
Visual guide about How to Build Dehumidifier
Image source: i.ytimg.com
Condensation-Based Dehumidifiers
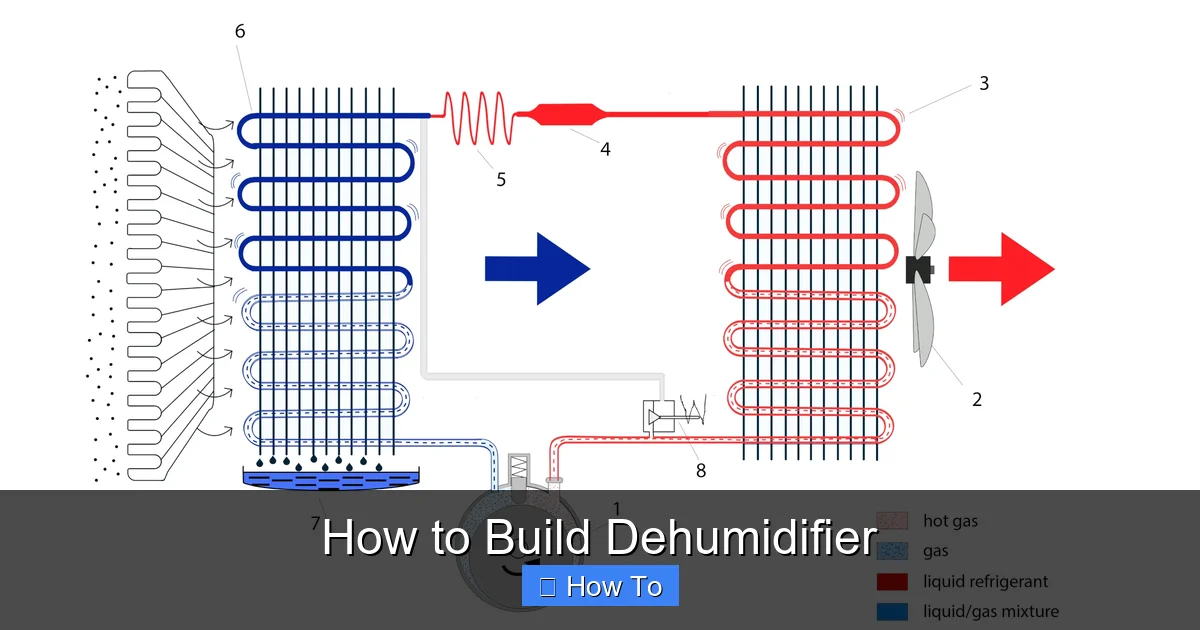
These are the most common types found in homes. They use a refrigeration cycle: a fan pulls humid air over cold coils, causing moisture to condense into water, which collects in a tank. The dry air is then reheated and released back into the room. This method works best in warm, humid environments.
Desiccant-Based Dehumidifiers
Desiccant dehumidifiers use moisture-absorbing materials like silica gel, calcium chloride, or activated charcoal. Air passes over the desiccant, which traps water molecules. These units are quieter, work well in cooler temperatures, and don’t require refrigeration. They’re ideal for small spaces or DIY builds.
For most homemade projects, a desiccant-based system is simpler and safer. It doesn’t involve complex refrigeration parts, making it perfect for beginners. However, if you’re comfortable with electronics, an active electric model with a small fan and cooling element can also be built.
Choosing the Right Method for Your DIY Dehumidifier
Your choice depends on your space, budget, and technical skill.
Passive Desiccant System
This is the easiest and safest option. It uses no electricity (except possibly a small fan) and relies on moisture-absorbing materials. Great for closets, RVs, or small rooms. You’ll need to recharge or replace the desiccant regularly.
Active Electric System
This version includes a fan and possibly a Peltier cooler (a small thermoelectric device) to enhance condensation. It’s more effective but requires basic wiring and safety precautions. Best for larger areas or higher humidity levels.
For most beginners, we recommend starting with a passive desiccant model. It’s simple, reliable, and teaches the core principles of dehumidification. Once you’re comfortable, you can upgrade to an active system.
Materials and Tools You’ll Need
Here’s a complete list of materials for both methods. Most items are inexpensive and easy to find.
For a Passive Desiccant Dehumidifier
- Large plastic storage bin with lid (10–20 gallons)
- Small computer fan (12V, 80mm or 120mm)
- Silica gel beads (food-safe, indicating type preferred)
- Drill with 1/4″ and 1/2″ bits
- Hot glue gun or waterproof sealant
- Hygrometer (to measure humidity)
- Optional: mesh screen, zip ties, power adapter for fan
For an Active Electric Dehumidifier
- All items from the passive list
- Peltier module (TEC1-12706 or similar)
- Heat sinks (aluminum, for hot and cold sides)
- Thermal paste
- 12V power supply (wall adapter or battery pack)
- Wires and soldering iron (optional but recommended)
- Switch (optional, for on/off control)
You can find silica gel in craft stores, online, or even reuse it from packaging (just dry it first). Peltier modules are available on electronics sites like Amazon or Adafruit. Always use food-safe materials if the unit will be near living spaces.
Step-by-Step: Building a Passive Desiccant Dehumidifier
This is the simplest and most beginner-friendly method. It uses airflow and moisture-absorbing gel to reduce humidity.
Step 1: Prepare the Container
Choose a plastic bin with a tight-fitting lid. Clear bins let you see the silica gel, but opaque ones work too. Make sure it’s clean and dry.
Step 2: Drill Holes for Airflow
Use a drill to make small holes (1/4″) around the sides of the bin, about 2–3 inches from the bottom. These allow humid air to enter. On the lid, drill larger holes (1/2″) to let dry air exit. Space them evenly for balanced airflow.
Step 3: Install the Fan (Optional)
If you want faster drying, attach a small computer fan to the lid. Use hot glue to secure it over the exit holes. Connect it to a 12V power adapter. The fan should blow air out of the bin, creating slight negative pressure to draw humid air in.
Step 4: Add the Desiccant
Fill a mesh bag or perforated container with silica gel beads. Place it inside the bin, away from the intake holes. Don’t overfill—leave space for air to circulate. Indicating silica gel changes color when saturated (blue to pink), making it easy to know when to recharge.
Step 5: Seal and Test
Close the lid and place the unit in a humid area. Use a hygrometer to monitor humidity before and after. Within a few hours, you should see a drop in moisture levels.
This passive system works continuously but slowly. Recharge the silica gel by spreading it on a baking sheet and heating it in an oven at 250°F for 2–3 hours. Let it cool before reusing.
Step-by-Step: Building an Active Electric Dehumidifier
This version uses a Peltier cooler to enhance condensation, making it more powerful than the passive model.
Step 1: Assemble the Peltier Module
Attach a heat sink to both sides of the Peltier module using thermal paste. The cold side will face inward (toward the air), and the hot side will face outward (to dissipate heat). Secure with screws or zip ties.
Step 2: Mount the Fan and Cooler
Drill a hole in the bin lid large enough for the fan. Mount the fan so it blows air into the bin. Position the Peltier module below it, with the cold side facing down. The fan will push air over the cold surface, causing condensation.
Step 3: Create a Water Collection System
Place a small tray or sponge under the Peltier module to catch dripping water. You can also drill a small drain hole in the bin bottom and attach a tube to a collection cup.
Step 4: Wire the Components
Connect the fan and Peltier module to a 12V power supply. Use a switch if desired. Solder connections for durability, or use wire nuts. Always double-check polarity—reversing it can damage the Peltier.
Step 5: Test and Monitor
Turn on the unit and check for condensation. The cold side should frost slightly in humid conditions. Use a hygrometer to track humidity changes. Empty the water tray regularly.
This active model is more efficient but consumes electricity. It’s best for areas with persistent moisture, like basements or bathrooms.
Safety Tips and Best Practices
Safety is crucial when working with electricity and moisture.
- Unplug devices before assembling or adjusting wiring.
- Keep water away from power sources. Use waterproof containers and avoid spills.
- Use insulated wires and secure all connections to prevent shorts.
- Don’t overload circuits. A 12V adapter is usually safe, but avoid daisy-chaining multiple units.
- Ventilate the area when recharging silica gel—some types release fumes when heated.
Always supervise your dehumidifier during initial testing. If you smell burning or see sparks, turn it off immediately.
Maintaining Your DIY Dehumidifier
Regular maintenance ensures long-term performance.
Recharging Desiccants
Silica gel and calcium chloride lose effectiveness when saturated. Recharge silica gel in the oven as described. Calcium chloride can be boiled in water to remove moisture, then dried.
Cleaning Components
Wipe down the bin, fan, and heat sinks monthly. Mold can grow in damp areas, so use a mild bleach solution if needed. Replace mesh bags if they tear.
Checking for Wear
Inspect wires, seals, and the Peltier module for damage. Replace worn parts promptly. A well-maintained unit can last years.
Troubleshooting Common Issues
Even the best DIY projects can have hiccups. Here’s how to fix common problems.
No Moisture Removal
Check if the desiccant is saturated. Recharge or replace it. Ensure airflow isn’t blocked. If using a fan, verify it’s working and blowing in the right direction.
Water Leaking
Make sure the collection tray is secure and not overflowing. Seal any gaps in the bin with waterproof tape. Avoid overfilling the desiccant container.
Peltier Module Not Cooling
Confirm polarity—reverse wiring is a common mistake. Check the power supply voltage. Clean heat sinks; dust reduces efficiency.
Fan Not Spinning
Test the fan separately with a battery. Check wire connections and the power adapter. Replace if faulty.
Unusual Noise or Smell
Turn off the unit immediately. Inspect for loose parts, overheating, or mold. Clean thoroughly before reuse.
Customizing Your Dehumidifier
Once your basic unit works, consider upgrades.
- Add a timer: Use a plug-in timer to run the unit only when needed, saving energy.
- Use multiple fans: Increase airflow for faster drying.
- Larger container: Build a bigger version for whole-room dehumidification.
- Solar power: Connect to a small solar panel for off-grid use.
- Smart monitoring: Add a humidity sensor and microcontroller (like Arduino) to automate operation.
These enhancements make your dehumidifier more efficient and convenient.
Environmental and Cost Benefits
Building your own dehumidifier isn’t just practical—it’s eco-friendly.
Commercial units consume significant energy and often contain refrigerants that harm the environment. DIY models use less power, especially passive versions. You also reduce waste by reusing materials like plastic bins and old fans.
Cost-wise, a homemade dehumidifier can be built for under $30—much less than a $100+ store-bought model. Over time, the savings add up, especially if you maintain it well.
Conclusion: Take Control of Your Indoor Air Quality
Learning how to build a dehumidifier empowers you to improve your home’s air quality without breaking the bank. Whether you choose a simple desiccant box or a high-tech Peltier-powered unit, you’ll gain valuable skills and a custom solution tailored to your space.
Start small, follow safety guidelines, and don’t be afraid to experiment. With regular maintenance, your DIY dehumidifier can last for years, keeping your home dry, healthy, and comfortable. So gather your tools, pick a method, and get building—your future self will thank you.