
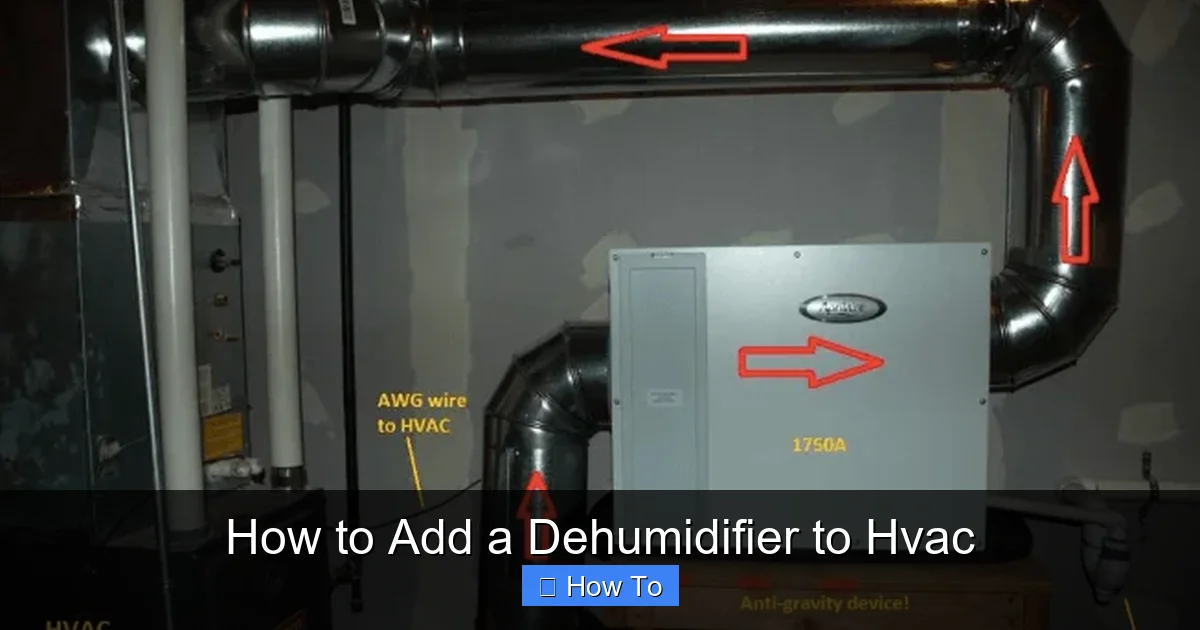
This guide walks you through how to add a dehumidifier to HVAC systems safely and effectively. Whether you’re a homeowner or DIY enthusiast, you’ll learn the tools, steps, and tips needed to integrate whole-house dehumidification for better air quality and comfort.
Quick Answers to Common Questions
Should I install a dehumidifier myself?
Only if you have experience with HVAC systems, electrical work, and ductwork. Otherwise, hire a licensed technician to ensure safety and proper function.
How much does it cost to add a dehumidifier to HVAC?
Costs range from $1,500 to $3,500, including equipment and installation. Prices vary by unit type, home size, and labor rates.
Will a dehumidifier increase my energy bill?
Slightly, but the improved efficiency of your HVAC system often offsets the cost. Look for ENERGY STAR-certified models for better efficiency.
Can I use a portable dehumidifier instead?
Portable units work for single rooms but aren’t effective for whole-house humidity control. They also require frequent emptying and maintenance.
How often should I run the dehumidifier?
Most systems run automatically based on humidity levels. Set your humidistat to 40–50% and let the unit cycle as needed.
How to Add a Dehumidifier to HVAC: A Complete Step-by-Step Guide
If you’ve ever walked into your home and felt sticky, clammy, or noticed musty odors, high humidity might be the culprit. While your HVAC system helps regulate temperature, it doesn’t always control moisture effectively—especially in humid climates or tightly sealed homes. That’s where adding a dehumidifier to your HVAC system comes in.
In this guide, you’ll learn how to add a dehumidifier to HVAC systems safely and efficiently. Whether you’re dealing with damp basements, allergy flare-ups, or warped wood furniture, integrating a dehumidifier can transform your indoor environment. We’ll cover everything from assessing your needs to choosing the right unit, installation steps, maintenance tips, and troubleshooting common issues.
By the end, you’ll have the knowledge to decide whether to tackle this project yourself or call in a professional—and how to ensure your system works seamlessly for years to come.
Why Add a Dehumidifier to Your HVAC System?
Before diving into installation, it’s important to understand why this upgrade matters. High indoor humidity doesn’t just feel uncomfortable—it can lead to serious problems:
– Mold and mildew growth: These thrive in moist environments and can damage walls, ceilings, and HVAC components.
– Increased allergens: Dust mites and mold spores multiply in humid conditions, worsening allergies and asthma.
– Structural damage: Excess moisture can warp wood, rust metal, and degrade insulation.
– Reduced HVAC efficiency: Your air conditioner works harder to cool humid air, increasing energy bills.
A dehumidifier integrated into your HVAC system addresses these issues at the source. Unlike portable units that only treat one room, a whole-house dehumidifier works with your furnace or air handler to remove moisture from the entire home—quietly and efficiently.
Step 1: Assess Your Home’s Humidity Levels
You can’t fix a problem you haven’t measured. Start by checking your indoor humidity.
Use a Hygrometer
A hygrometer is a small, inexpensive device that measures relative humidity (RH). You can find digital models for under $20 at hardware stores or online. Place it in different areas of your home—especially basements, bathrooms, and bedrooms—and check readings over several days.
Visual guide about How to Add a Dehumidifier to Hvac
Image source: hvactrainingshop.com
Ideal Humidity Range
Experts recommend keeping indoor humidity between 30% and 50%. Levels above 60% create ideal conditions for mold and dust mites. If your readings consistently exceed this range, it’s time to consider a dehumidifier.
Look for Signs of High Humidity
- Condensation on windows or walls
- Musty smells, especially in basements or closets
- Peeling paint or wallpaper
- Warped wood floors or furniture
- Increased static electricity
If you notice several of these signs, your home could benefit from a dehumidifier.
Step 2: Choose the Right Type of Dehumidifier
Not all dehumidifiers are created equal. For HVAC integration, you’ll want a unit designed to work with ductwork and central systems. Here are the main options:
Whole-House Ventilating Dehumidifiers
These are the most common choice for HVAC integration. They connect directly to your ductwork and use a fan to pull air through a dehumidifying coil. Many models include fresh air intake, allowing them to bring in and dehumidify outside air—ideal for homes with ventilation issues.
Bypass Dehumidifiers
These units work by drawing air from a return duct, dehumidifying it, and sending it back into the supply duct. They’re efficient and don’t require a separate fan, making them quieter and easier to install.
Refrigerant vs. Desiccant Dehumidifiers
- Refrigerant dehumidifiers: Use cooling coils to condense moisture. Best for warm, humid climates (above 65°F). Most common in residential HVAC systems.
- Desiccant dehumidifiers: Use moisture-absorbing materials (like silica gel). Better for colder environments or very low humidity needs. Often used in commercial settings.
Capacity Matters
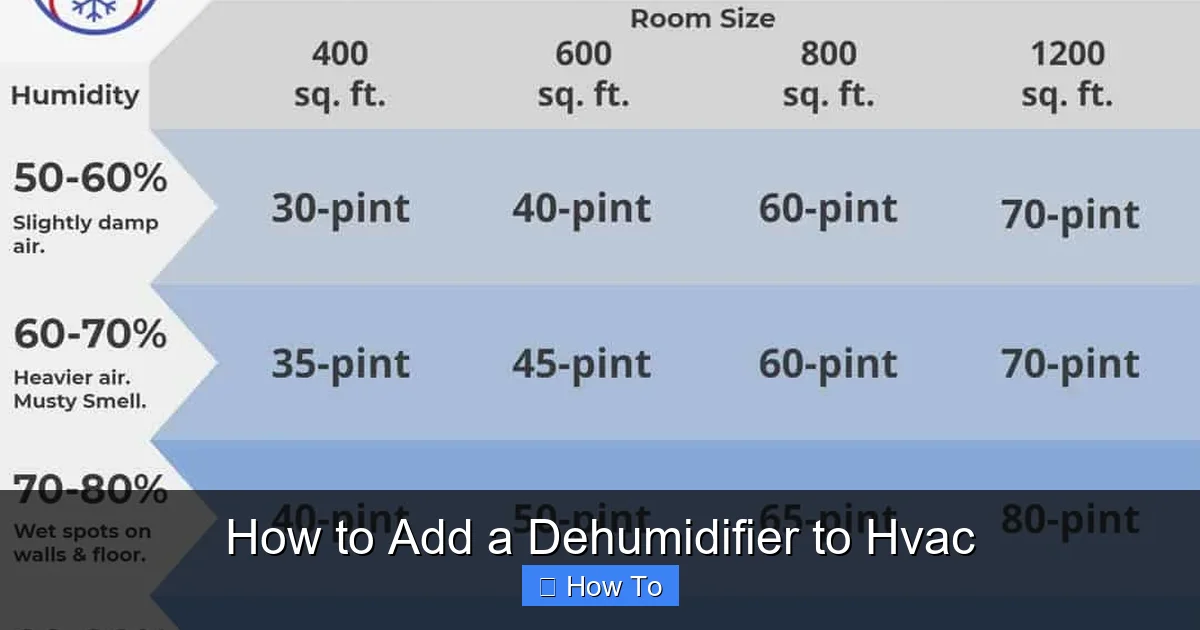
Dehumidifiers are rated by how many pints of moisture they remove per day. For whole-house systems, look for units rated between 50 and 100 pints per day, depending on your home’s size and humidity level. A professional can help determine the right capacity.
Step 3: Evaluate Your HVAC System
Before installing a dehumidifier, make sure your HVAC system can support it.
Check Ductwork Compatibility
Your ducts must be in good condition and properly sized. Leaky or undersized ducts can reduce efficiency and cause pressure imbalances. If your ducts are old or damaged, consider having them inspected and sealed first.
Assess Airflow and Static Pressure
Adding a dehumidifier can increase static pressure in your duct system. Most modern units are designed to work within standard HVAC airflow ranges, but it’s important to verify compatibility. A technician can measure your system’s CFM (cubic feet per minute) and static pressure to ensure smooth operation.
Power Supply and Electrical Requirements
Whole-house dehumidifiers typically require a dedicated 120V or 240V circuit. Check your electrical panel to ensure there’s space and capacity. If not, an electrician may need to install a new circuit.
Step 4: Plan the Installation Location
Where you install the dehumidifier affects performance and maintenance access.
Best Locations
- Near the air handler or furnace: This allows easy connection to supply and return ducts.
- Basement or utility room: Ideal for units with built-in pumps or gravity drainage.
- Attic (with caution): Possible, but ensure proper insulation and access for maintenance.
Avoid These Spots
- Inside living spaces (too noisy)
- Areas with poor ventilation
- Locations prone to flooding or extreme temperatures
Clearance and Access
Leave at least 12–18 inches of clearance around the unit for airflow and service. Ensure the location allows easy access to filters, drains, and electrical connections.
Step 5: Install the Dehumidifier (Step-by-Step)
Now for the main event: installing the dehumidifier. While this guide provides a general overview, we strongly recommend hiring a licensed HVAC technician for safety and compliance. However, if you’re experienced with ductwork and electrical systems, here’s how it’s typically done.
Turn Off Power
Before starting, shut off power to your HVAC system at the main breaker. This prevents accidental shocks or damage to components.
Cut into the Ductwork
Using a duct cutter or reciprocating saw, make two openings in your duct system:
- One in the return duct to draw air into the dehumidifier.
- One in the supply duct to return dehumidified air.
Use foil tape or mastic sealant to ensure airtight connections.
Mount the Dehumidifier
Secure the unit to a wall, ceiling, or stand using manufacturer-provided brackets. Ensure it’s level and stable. Some models come with vibration pads to reduce noise.
Connect the Ducts
Attach flexible or rigid ducting from the dehumidifier’s inlet and outlet to the corresponding duct openings. Use clamps and seal all joints to prevent air leaks.
Install the Drain Line
Most dehumidifiers produce condensate that must be drained. Options include:
- Gravity drain: Run a hose from the unit to a floor drain or sump pit. Ensure a downward slope.
- Pump drain: Use a built-in or external pump to send water to a sink, toilet, or outside.
- Condensate removal system: Some units connect to your HVAC’s existing drain line.
Test the drain to ensure it flows freely.
Wire the Unit
Connect the dehumidifier to a dedicated circuit. Follow the manufacturer’s wiring diagram carefully. Most units use low-voltage control wires that connect to your thermostat or HVAC control board. This allows the dehumidifier to turn on when humidity is high—even if the AC isn’t running.
Integrate with Thermostat (Optional)
Some smart thermostats support humidity control. If yours does, you can set a target humidity level (e.g., 45%) and let the system自动调节. Otherwise, the dehumidifier may have its own humidistat.
Restore Power and Test
Turn the power back on and run the system. Check for:
- Proper airflow through the dehumidifier
- No unusual noises or vibrations
- Condensate draining correctly
- Humidity levels dropping over time
Allow the system to run for 24–48 hours and monitor performance.
Step 6: Maintain Your Dehumidifier
Regular maintenance keeps your dehumidifier running efficiently and extends its lifespan.
Clean or Replace Filters
Most units have washable or replaceable air filters. Clean them every 1–3 months, or more often if you have pets or allergies. A clogged filter reduces airflow and efficiency.
Inspect and Clean the Coil
Dust and debris can build up on the evaporator and condenser coils. Use a soft brush or vacuum to clean them annually. For refrigerant units, avoid damaging the fins.
Check the Drain Line
Algae and mold can grow in stagnant water. Flush the drain line with a mixture of water and vinegar every few months. Ensure it’s not kinked or blocked.
Monitor Humidity Levels
Continue using your hygrometer to track indoor humidity. Adjust settings if needed. In winter, you may need to reduce dehumidification to prevent over-drying.
Schedule Professional Tune-Ups
Have an HVAC technician inspect the system annually. They can check refrigerant levels (if applicable), test controls, and ensure everything is working safely.
Troubleshooting Common Issues
Even the best systems can run into problems. Here’s how to handle common issues:
Dehumidifier Isn’t Removing Moisture
- Check the filter—replace if dirty.
- Ensure the unit is sized correctly for your home.
- Verify that the humidistat is set properly.
- Look for refrigerant leaks (hissing sounds or ice on coils).
Water Leaking from the Unit
- Inspect the drain line for clogs or disconnections.
- Ensure the unit is level—tilting can cause overflow.
- Check the condensate pump (if used) for proper operation.
Unit Is Too Noisy
- Tighten loose mounting brackets.
- Replace worn fan motors or bearings.
- Ensure the unit isn’t vibrating against ducts or walls.
HVAC System Seems Less Efficient
- Verify duct connections are sealed.
- Check for increased static pressure—may require a duct booster fan.
- Ensure the dehumidifier isn’t running when the AC is off unnecessarily.
When to Call a Professional
While some steps can be DIY-friendly, certain aspects of adding a dehumidifier to HVAC systems require expertise:
– Electrical wiring and circuit installation
– Refrigerant handling (for certain models)
– Ductwork modifications and sealing
– System integration with thermostats and controls
A licensed HVAC technician can ensure the job is done safely, efficiently, and in compliance with local codes. They can also help you choose the best unit for your home and climate.
Conclusion
Adding a dehumidifier to your HVAC system is a smart investment in your home’s comfort, health, and longevity. By controlling indoor humidity, you reduce the risk of mold, protect your belongings, and improve air quality—all while helping your HVAC system run more efficiently.
From assessing your needs to choosing the right unit, planning the installation, and maintaining the system, this guide has walked you through every step. Remember, while DIY is possible, professional installation is often the safest and most effective route.
With the right setup, you’ll enjoy a drier, healthier, and more comfortable home year-round. So take the first step today—measure your humidity, explore your options, and breathe easier tomorrow.