

Yes, a dehumidifier can be used to dry lumber—especially in controlled indoor environments. This method, known as dehumidification drying or solar-assisted drying, slowly reduces moisture content while minimizing cracking and warping. It’s ideal for small-scale projects, woodworking hobbyists, and those without access to commercial kilns.
Key Takeaways
- Dehumidifiers can dry lumber effectively: When used in a sealed space, they slowly remove moisture from wood, mimicking natural air-drying but with better control.
- Best for small batches: This method works well for 1–5 cords of lumber or smaller woodworking projects, not large-scale operations.
- Requires consistent monitoring: You must track moisture levels with a moisture meter and maintain stable temperature and humidity.
- Prevents defects better than air-drying: Controlled drying reduces risks of mold, warping, and checking compared to outdoor air-drying.
- Energy-efficient compared to kilns: Dehumidifiers use less power than conventional kilns, making them a greener option for home use.
- Proper setup is crucial: The drying chamber must be airtight, well-ventilated, and equipped with fans for even air circulation.
- Not all dehumidifiers are equal: Choose a high-capacity, low-temperature model designed for continuous operation in cool environments.
Quick Answers to Common Questions
Can I use a regular household dehumidifier to dry lumber?
Yes, but choose one with at least 50 pints per day capacity and low-temperature operation. Avoid cheap models that overheat or shut off in cool environments.
How long does it take to dry lumber with a dehumidifier?
It depends on thickness and species, but 4/4 (1-inch) softwood typically takes 4–8 weeks. Hardwoods may take 8–12 weeks or longer.
Do I need a special chamber to dry lumber with a dehumidifier?
Yes. A sealed or semi-sealed space helps maintain consistent humidity and temperature. A garage, basement, or shed works well.
Can I dry green lumber directly from the tree?
Yes, but it’s best to seal the end grain with wax or shellac first to prevent cracking. Also, avoid stacking boards too tightly.
Is dehumidifier drying better than air-drying?
It’s faster and more controlled, reducing the risk of mold, insects, and weather damage. However, it requires more setup and monitoring.
📑 Table of Contents
- Can a Dehumidifier Be Used to Dry Lumber?
- Understanding Wood Moisture and Drying Basics
- How Dehumidifier Drying Works
- Setting Up a DIY Dehumidifier Drying Chamber
- Monitoring and Managing the Drying Process
- Pros and Cons of Dehumidifier Drying
- Real-World Example: Drying Pine Shelving with a Dehumidifier
- Tips for Success
- Conclusion
Can a Dehumidifier Be Used to Dry Lumber?
If you’ve ever tried to build a bookshelf, a dining table, or even a simple cutting board, you know that using wet or green lumber can lead to disaster. Wood shrinks as it dries, and if it dries too quickly or unevenly, it can warp, crack, or split—ruining your project before you even begin. That’s why proper drying is one of the most important steps in woodworking.
Now, you might be wondering: can I just use a dehumidifier to dry my lumber at home? After all, dehumidifiers pull moisture out of the air—so why not out of wood? The short answer is yes, you can. But like most things in woodworking, it’s not as simple as plugging in a machine and walking away. Drying lumber with a dehumidifier is a viable method, especially for hobbyists, small-scale woodworkers, and those without access to industrial kilns. It’s a controlled, energy-efficient way to bring wood down to a stable moisture content—typically between 6% and 8% for indoor use.
But how does it work? What kind of setup do you need? And what are the pitfalls to avoid? In this guide, we’ll walk you through everything you need to know about using a dehumidifier to dry lumber, from the science behind it to practical tips for success.
Understanding Wood Moisture and Drying Basics
Visual guide about Can a Dehumidifier Be Used to Dry Lumber
Image source: woodworkersjournal.com
Before diving into dehumidifier drying, it helps to understand why wood needs to be dried in the first place—and what happens when it dries incorrectly.
Wood is a hygroscopic material, meaning it naturally absorbs and releases moisture based on the humidity of its surroundings. Freshly cut, or “green,” lumber can contain 30% to 200% moisture content, depending on the species and how it was stored. When wood dries, it loses this moisture in two main stages: first, the free water in the cell cavities evaporates, and then the bound water within the cell walls is released.
The critical point in this process is the fiber saturation point (FSP), which is typically around 25–30% moisture content. Below this point, the wood begins to shrink. If drying happens too quickly, the outer layers dry and shrink while the inner core is still wet. This creates internal stress, leading to cracks, splits, warping, or cupping.
That’s why slow, controlled drying is essential. Traditional air-drying takes months or even years, depending on climate and wood thickness. Kiln drying speeds up the process but requires expensive equipment and significant energy. Dehumidifier drying strikes a balance—it’s faster than air-drying, more affordable than a kiln, and gives you greater control over the environment.
Why Controlled Drying Matters
Imagine you’re building a hardwood floor. You cut your planks from green oak, and a week later, you install them. Sounds great—until a month later, when gaps appear between the boards, or worse, the floor starts to buckle. That’s because the wood continued to dry after installation, shrinking as it lost moisture.
This is why wood must be dried to equilibrium moisture content (EMC)—the point where it’s in balance with the surrounding air. For most indoor environments, that’s between 6% and 8%. If your wood is too wet when you use it, it will shrink over time, causing structural and aesthetic problems.
Dehumidifier drying helps you reach that target EMC in a controlled way. By maintaining a consistent low-humidity environment, you encourage slow, even moisture loss—reducing the risk of defects and ensuring your wood stays stable once it’s in your project.
How Dehumidifier Drying Works

Visual guide about Can a Dehumidifier Be Used to Dry Lumber
Image source: i.ytimg.com
So, how exactly does a dehumidifier dry lumber? It’s not magic—it’s physics.
A dehumidifier works by pulling warm, moist air from the room, cooling it to condense the moisture, and then reheating the air before blowing it back out. This process reduces the relative humidity in the space. When lumber is placed in this low-humidity environment, moisture naturally migrates from the wetter wood to the drier air.
But here’s the key: the dehumidifier doesn’t dry the wood directly. Instead, it creates conditions that encourage the wood to release moisture slowly and evenly. Think of it like hanging wet clothes in a room with a dehumidifier—they dry faster than they would in a humid basement, but not as fast as in direct sunlight.
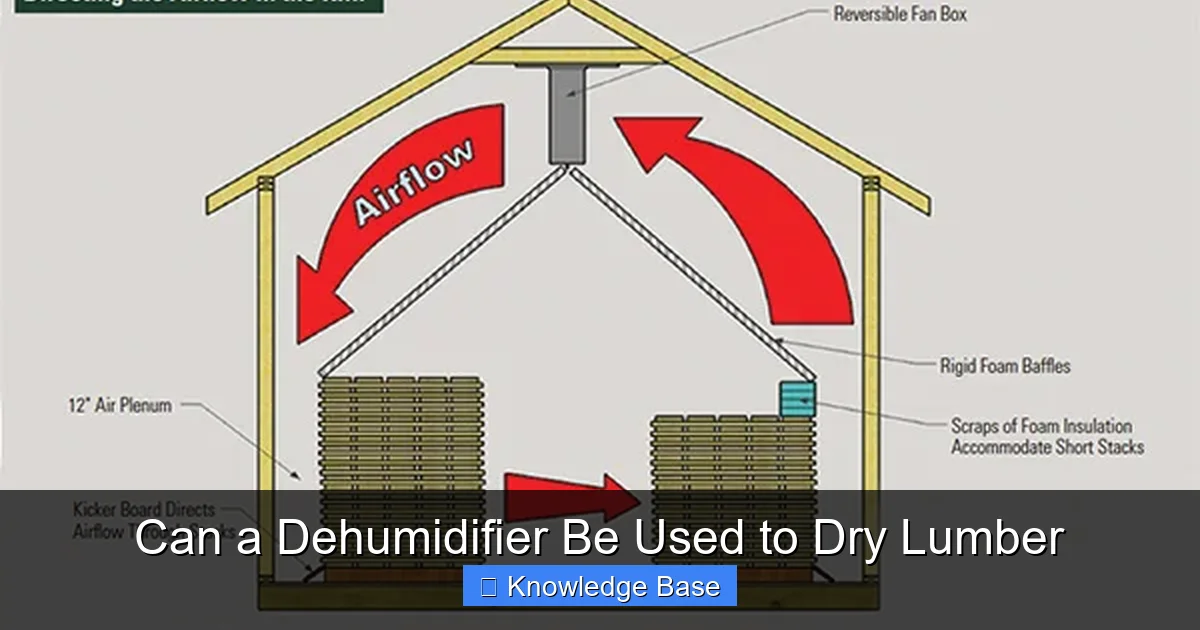
For this to work effectively, the lumber must be in a sealed or semi-sealed chamber where the dehumidifier can maintain consistent conditions. This is often called a “solar kiln” or “dehumidification kiln,” even if it doesn’t use solar power. The chamber traps the moist air, allowing the dehumidifier to continuously remove moisture without losing efficiency.
The Role of Air Circulation
One of the most overlooked aspects of dehumidifier drying is air circulation. A dehumidifier alone won’t do the job if the air around the lumber isn’t moving. Stagnant air creates microclimates—some areas dry faster than others, leading to uneven shrinkage and stress.
That’s why fans are essential. Place oscillating fans around the lumber stack to ensure air flows evenly across all surfaces. This helps maintain uniform drying and prevents pockets of high humidity from forming between boards.
Temperature and Humidity Control
Most dehumidifiers work best in temperatures above 65°F (18°C). Below that, their efficiency drops significantly. If you’re drying lumber in a cold garage or shed, you may need to add a small heater to keep the temperature stable.
The ideal relative humidity for drying lumber is between 40% and 60%, depending on the target moisture content. A hygrometer (humidity sensor) is a must-have tool to monitor conditions. Some advanced dehumidifiers come with built-in hygrometers and automatic shut-off features, but standalone models give you more flexibility.
Setting Up a DIY Dehumidifier Drying Chamber
Now that you understand the basics, let’s talk about how to build your own drying setup. You don’t need a professional kiln—just a few key components and some careful planning.
Choosing the Right Space
The first step is selecting a location. You’ll need a room, shed, or enclosed space that can be sealed to prevent outside air from interfering. A basement, garage, or spare room works well. The space should be insulated if possible, to maintain stable temperatures.
Avoid areas with high external humidity, like near a laundry room or bathroom. Also, make sure there’s enough clearance around the dehumidifier for airflow—most models need at least 6–12 inches of space on all sides.
Building the Lumber Stack
How you stack your lumber is just as important as the drying environment. Follow these best practices:
– Use stickers (small wooden spacers) between each layer of boards to allow air to flow through the stack. Stickers should be 1×1 inch or similar, made from dry, stable wood like pine or cedar.
– Align stickers vertically so they form a grid—this prevents bending and ensures even weight distribution.
– Stack boards with the crown (curved side) facing up to minimize cupping.
– Leave space between boards if they’re particularly thick or dense.
For example, if you’re drying 8/4 (2-inch thick) walnut, you might use 1-inch stickers every 16–24 inches along the length of the boards. This creates a stable, breathable stack that dries uniformly.
Sealing the Chamber
To maximize efficiency, seal the drying chamber as much as possible. Use plastic sheeting, weather stripping, or foam board to close gaps around doors, windows, and vents. The goal is to create a controlled environment where the dehumidifier can maintain consistent humidity without fighting outside air.
However, don’t make it completely airtight. A small vent or passive airflow path is necessary to prevent pressure buildup and allow fresh air to enter slowly. Some builders install a small intake vent with a damper to control airflow.
Choosing the Right Dehumidifier
Not all dehumidifiers are created equal—especially when it comes to lumber drying. Here’s what to look for:
– **Capacity:** Choose a model rated for at least 50 pints per day (PPD). For larger batches, go for 70 PPD or higher.
– **Low-temperature operation:** Some dehumidifiers shut off below 65°F. Look for models that work down to 40°F or lower.
– **Continuous drainage:** A hose attachment lets you drain water automatically, so you don’t have to empty the bucket daily.
– **Durability:** Industrial or commercial-grade models last longer under constant use.
Popular options include the Frigidaire FFAD7033R1 (70 PPD) or the hOmeLabs 50 Pint Dehumidifier. For serious woodworkers, consider a desiccant dehumidifier, which works better in cold environments but costs more.
Monitoring and Managing the Drying Process
Drying lumber isn’t a set-it-and-forget-it process. You’ll need to monitor conditions regularly and make adjustments as needed.
Using a Moisture Meter
A pin-type or pinless moisture meter is essential. Check the moisture content of your lumber every few days, especially in the first few weeks. Insert the pins into the end grain or use the pinless sensor on the face of the board.
For accurate readings, test multiple boards at different depths. End grain dries faster than the center, so don’t rely on surface readings alone. A good target is 6–8% for indoor use, but some species may need to go lower.
Weighing the Lumber (Optional but Effective)
For even more precision, you can weigh your lumber periodically. By tracking weight loss, you can estimate moisture content without damaging the wood. This method requires knowing the initial green weight and the oven-dry weight (which you can calculate by drying a small sample in an oven at 215°F until it stops losing weight).
For example, if a board weighs 10 pounds when green and 8 pounds when dry, and it currently weighs 9 pounds, it’s roughly halfway to dry. This gives you a real-time snapshot of progress.
Adjusting Conditions
If drying is too slow, you can slightly increase the temperature or reduce humidity. If it’s too fast, add a humidifier or reduce fan speed. The key is gradual change—avoid sudden shifts that can cause stress.
Also, rotate boards periodically if possible. This ensures even exposure and prevents one side from drying faster than the other.
Pros and Cons of Dehumidifier Drying
Like any method, dehumidifier drying has advantages and limitations. Let’s break them down.
Advantages
– **Cost-effective:** A quality dehumidifier costs $200–$500—far less than a commercial kiln.
– **Energy-efficient:** Uses 30–50% less energy than conventional kilns.
– **Controlled environment:** Reduces risk of mold, insects, and weather damage.
– **Faster than air-drying:** Can dry 4/4 (1-inch) lumber in 4–8 weeks, compared to 6–12 months outdoors.
– **Accessible:** Perfect for home workshops, garages, or small businesses.
Limitations
– **Limited capacity:** Best for small batches (1–5 cords). Not practical for large-scale operations.
– **Space requirements:** Needs a dedicated, sealed room.
– **Ongoing monitoring:** Requires regular checks and adjustments.
– **Not for all species:** Very dense or resinous woods (like teak or rosewood) may dry too slowly or require higher temperatures.
– **Initial setup time:** Building the chamber and stacking lumber takes effort.
Real-World Example: Drying Pine Shelving with a Dehumidifier
Let’s say you’ve cut some 1×12 pine boards to make floating shelves. They’re fresh from the sawmill with about 35% moisture content. You want to dry them to 7% for indoor use.
Here’s how you’d do it:
1. Build a stack using 1×1 pine stickers every 18 inches.
2. Place the stack in your sealed garage drying chamber.
3. Set up a 50 PPD dehumidifier with a drain hose.
4. Add two oscillating fans for air circulation.
5. Use a hygrometer to maintain 50% relative humidity and a thermometer to keep temps around 70°F.
6. Check moisture content weekly with a pinless meter.
7. After 5 weeks, the boards reach 7.5%—close enough. Let them acclimate in your home for a week before cutting and finishing.
Result? Smooth, stable shelves with no warping or cracking.
Tips for Success
– **Start with dry stickers:** Wet stickers can transfer moisture to your lumber.
– **Seal end grain:** Apply wax or shellac to the ends of boards to slow end-drying and reduce checking.
– **Avoid over-drying:** Going below 6% can make wood brittle and difficult to work with.
– **Label your stacks:** Note the species, thickness, and start date to track progress.
– **Be patient:** Rushing the process leads to defects. Slow and steady wins the race.
Conclusion
So, can a dehumidifier be used to dry lumber? Absolutely. It’s a smart, efficient, and accessible method for anyone looking to dry wood at home without breaking the bank or sacrificing quality. While it’s not a replacement for industrial kilns, it’s perfect for hobbyists, small woodshops, and DIYers who want better control over their materials.
By understanding the science of wood drying, setting up a proper chamber, and monitoring conditions closely, you can achieve professional-grade results with just a dehumidifier, some fans, and a little patience. Whether you’re building furniture, cabinets, or musical instruments, properly dried lumber is the foundation of a great project.
So go ahead—give it a try. Your future self (and your woodworking projects) will thank you.
Frequently Asked Questions
What moisture content should lumber be for indoor use?
Lumber should be dried to 6–8% moisture content for most indoor applications. This matches the equilibrium moisture content of typical home environments.
Can I dry hardwood and softwood together?
It’s not recommended. Hardwoods dry slower than softwoods, so mixing them can lead to uneven drying and stress. Dry similar species and thicknesses together.
Do I need to rotate the lumber during drying?
Rotating boards every few weeks helps ensure even drying, especially for thick or dense species. It’s not always necessary but can improve results.
Can I use a dehumidifier in a cold garage?
Yes, but choose a low-temperature model and consider adding a small heater to keep temperatures above 50°F for optimal performance.
How do I know when the lumber is dry enough?
Use a moisture meter to check multiple boards at different depths. When readings stabilize at 6–8%, the wood is ready for indoor use.
Is dehumidifier drying safe for all wood types?
Most common hardwoods and softwoods work well. However, very oily or resinous woods may require higher temperatures or longer drying times.