

This guide walks you through how to add a whole house dehumidifier to your HVAC system safely and effectively. You’ll learn about sizing, installation, ductwork, and maintenance to keep your home comfortable and mold-free.
Quick Answers to Common Questions
Tip/Question?
Can I install a whole house dehumidifier myself?
Yes, if you have HVAC experience and follow safety guidelines. However, electrical and ductwork work often require a licensed professional.
Tip/Question?
How much does it cost to add a whole house dehumidifier?
Units range from $1,200 to $3,500, plus $500–$1,500 for professional installation. Total cost depends on size, features, and labor.
Tip/Question?
Do I need a separate thermostat for the dehumidifier?
Not always. Many units have built-in humidistats. You can also integrate with a smart thermostat that supports humidity control.
Tip/Question?
Will a dehumidifier increase my energy bill?
It uses electricity, but it can reduce AC runtime by making your home feel cooler. ENERGY STAR models minimize energy use.
Tip/Question?
How often should I clean the filter?
Check monthly and clean or replace every 1–3 months, depending on usage and air quality.
How to Add a Whole House Dehumidifier: A Complete Step-by-Step Guide
If you’ve ever walked into your basement and felt that damp, musty smell, or noticed condensation on your windows, you’re dealing with high indoor humidity. While portable dehumidifiers help in small spaces, they’re not enough for whole-home comfort. That’s where a whole house dehumidifier comes in.
In this guide, you’ll learn how to add a whole house dehumidifier to your home’s HVAC system. Whether you’re building a new house or upgrading an existing one, this step-by-step walkthrough will help you choose the right unit, install it correctly, and maintain it for long-term performance. We’ll cover everything from assessing your needs to troubleshooting common issues—so you can enjoy cleaner, healthier, and more comfortable air year-round.
Why Install a Whole House Dehumidifier?
High humidity doesn’t just feel uncomfortable—it can damage your home and harm your health. Excess moisture encourages mold growth, warps wood, ruins furniture, and triggers allergies or asthma. A whole house dehumidifier removes moisture from the air throughout your entire home, not just one room.
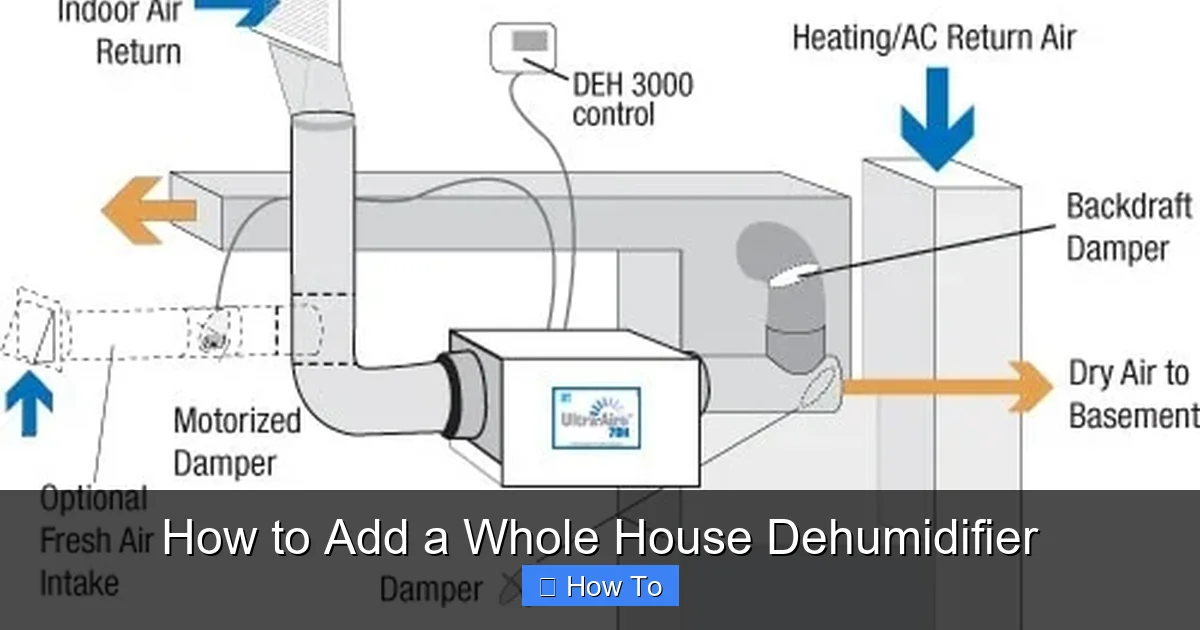
Visual guide about How to Add a Whole House Dehumidifier
Image source: bestdehumidifier.reviews
Unlike portable units that only treat small areas, a whole house system integrates with your HVAC ductwork. It works quietly in the background, maintaining ideal humidity levels (between 30% and 50%) automatically. This improves indoor air quality, protects your home’s structure, and even reduces energy costs by helping your air conditioner work more efficiently.
Step 1: Assess Your Home’s Humidity Needs
Before buying or installing anything, you need to understand how much dehumidification your home actually needs. This depends on three main factors: square footage, climate, and current humidity levels.
Measure Your Home’s Square Footage
Start by calculating the total livable area of your home. Include basements, attics (if finished), and all floors. For example, a 2,000-square-foot home with a finished basement might total 2,800 square feet.
Test Current Humidity Levels
Use a digital hygrometer (available at hardware stores for under $20) to measure humidity in different areas. Place it in the basement, main living area, and upstairs. Take readings at different times of day—humidity can spike after showers or on rainy days.
If readings consistently exceed 50%, you likely need a dehumidifier. Levels above 60% significantly increase mold risk.
Consider Your Climate
Homes in humid regions (like the Southeast U.S., Gulf Coast, or Pacific Northwest) need more powerful units. Coastal areas or homes near lakes may require continuous operation during certain seasons.
Evaluate Existing HVAC System
Check if your furnace and air handler are compatible with a dehumidifier. Most modern systems can support one, but older units may need upgrades. Also, confirm you have accessible ductwork and space for installation—typically in a basement, utility room, or attic.
Step 2: Choose the Right Whole House Dehumidifier
Not all dehumidifiers are created equal. Choosing the right model ensures efficiency, longevity, and effective moisture control.
Understand Capacity Ratings
Dehumidifiers are rated by how many pints of moisture they can remove in 24 hours. For whole house units, look for models ranging from 70 to 150 pints per day (PPD).
- 70–90 PPD: Suitable for homes up to 2,500 sq. ft. in moderate humidity.
- 90–120 PPD: Ideal for 2,500–4,000 sq. ft. or high-humidity areas.
- 120–150 PPD: Best for large homes, basements, or extremely humid climates.
For example, a 3,000-square-foot home in Florida might need a 120 PPD unit, while the same size home in Arizona may only need 70 PPD.
Look for Energy Efficiency
Check the Energy Factor (EF)—measured in liters of water removed per kilowatt-hour (L/kWh). Higher EF means better efficiency. ENERGY STAR-certified models use 15–30% less energy than standard units.
Consider Key Features
- Built-in humidistat: Automatically maintains your desired humidity level.
- Automatic defrost: Prevents ice buildup in cold climates.
- Drain pump: Helps move water uphill to a floor drain or sump pump.
- Filter access: Easy-to-replace filters improve air quality and performance.
- Smart controls: Wi-Fi connectivity lets you monitor and adjust settings via smartphone.
Popular Brands to Consider
Some trusted brands include AprilAire, Santa Fe, Honeywell, and Therma-Stor. AprilAire is especially popular for residential installations due to reliability and ease of integration.
Step 3: Plan the Installation Location
Where you install the dehumidifier affects performance, maintenance, and safety. The ideal location balances accessibility, airflow, and drainage.
Best Locations
- Basement: Most common spot. Cool, enclosed, and often near the furnace.
- Utility or mechanical room: Central location with existing ductwork.
- Attic (if insulated and accessible): Works well for homes without basements, but requires proper insulation and ventilation.
Avoid These Spots
- Living areas (too noisy)
- Garages (temperature fluctuations and contaminants)
- Crawl spaces (unless specifically designed for it)
Space Requirements
Leave at least 12–18 inches of clearance around the unit for airflow and maintenance. Ensure the floor is level and can support the weight (most units weigh 80–150 lbs).
Step 4: Prepare for Installation
Before mounting the unit, gather tools, materials, and safety gear. Proper preparation prevents delays and mistakes.
Tools and Materials Needed
- Drill and bits
- Duct tape or mastic sealant
- Sheet metal screws
- Wire strippers and electrical connectors
- Level
- Measuring tape
- Safety goggles and gloves
- Condensate drain tubing (¼” or ⅜” PVC or vinyl)
- Drain pan and pump (if needed)
Safety First
Turn off power to your HVAC system at the breaker box. If you’re not experienced with electrical work, hire a licensed electrician. Water and electricity don’t mix—always follow local codes.
Step 5: Install the Dehumidifier
Now it’s time to mount the unit and connect it to your ductwork. Follow the manufacturer’s instructions closely, but here’s a general guide.
Mount the Unit
Use the included mounting brackets to secure the dehumidifier to the wall or floor. Ensure it’s level and stable. Some models sit on the floor; others hang from joists.
Connect to Ductwork
Most whole house dehumidifiers use a “bypass” or “return air” installation method.
- Bypass Installation: A small duct connects the dehumidifier to the return air duct. Air is pulled from the return, dehumidified, and sent back. This is common and efficient.
- Dedicated Return Installation: The dehumidifier pulls air directly from a central return grille. Better for homes with poor air circulation.
Cut two holes in the ductwork: one for intake, one for output. Use sheet metal screws and seal all joints with mastic to prevent air leaks.
Install the Condensate Drain
The dehumidifier collects water in an internal tank or directs it to a drain line. For continuous operation, connect a drain hose.
- Run ¼” or ⅜” tubing from the unit to a floor drain, sump pump, or utility sink.
- Use a trap (U-shaped bend) to prevent air from entering the system.
- If the drain is below the unit, install a condensate pump with a float switch for automatic shutoff if the pump fails.
Wire the Unit
Connect the dehumidifier to a dedicated 120V or 240V circuit, depending on the model. Use wire nuts and electrical tape to secure connections. Label the circuit at the breaker box.
Some units can be controlled by your thermostat or a separate humidistat. If using a smart thermostat, follow the wiring diagram to integrate humidity control.
Step 6: Test and Calibrate the System
Once installed, it’s time to power up and test.
Turn On the Power
Restore power at the breaker. Set the humidistat to your desired level (e.g., 45%). The unit should start within a few minutes.
Check Airflow
Feel for air movement at the intake and output ducts. Use a piece of tissue to see if it’s drawn toward the intake. Weak airflow may indicate a blocked filter or undersized duct.
Verify Drainage
Run the unit for 30–60 minutes. Check that water flows steadily through the drain line and doesn’t leak. If using a pump, ensure it activates and shuts off properly.
Monitor Humidity
Use your hygrometer to track humidity levels over 24–48 hours. Adjust the humidistat if needed. Ideal range: 30–50%.
Step 7: Maintain Your Dehumidifier
Regular maintenance keeps your system running efficiently and prevents breakdowns.
Monthly Tasks
- Check and clean the air filter (washable or replaceable).
- Inspect the drain line for clogs or leaks.
- Wipe down the exterior with a damp cloth.
Every 3–6 Months
- Clean the evaporator and condenser coils with a soft brush or coil cleaner.
- Check electrical connections for corrosion or looseness.
- Test the humidistat and controls.
Annually
- Have a professional inspect the system, especially if you notice reduced performance.
- Replace the filter if it’s disposable.
- Flush the drain line with vinegar to prevent algae buildup.
Troubleshooting Common Issues
Even the best systems can run into problems. Here’s how to fix the most common ones.
Unit Won’t Turn On
- Check the power supply and breaker.
- Ensure the humidistat is set below current humidity.
- Verify the condensate drain isn’t full or blocked (many units have a safety switch).
Not Removing Enough Moisture
- Clean or replace the filter.
- Check for duct leaks or poor airflow.
- Ensure the unit is sized correctly for your home.
Water Leaking
- Inspect drain line for cracks or disconnections.
- Clear clogs with a wet/dry vacuum or pipe cleaner.
- Ensure the drain pan isn’t cracked.
Ice on Coils
- This happens in cold environments. Enable the defrost function or relocate the unit to a warmer area.
- Check if the airflow is restricted (dirty filter or blocked ducts).
Excessive Noise
- Tighten loose panels or mounting brackets.
- Ensure the unit is level and not vibrating against walls.
- Listen for unusual sounds—grinding or rattling may indicate a failing fan motor.
Should You DIY or Hire a Professional?
Installing a whole house dehumidifier involves electrical work, duct modifications, and plumbing—so it’s not a simple plug-and-play project.
DIY is possible if you’re experienced with HVAC systems, comfortable with wiring, and confident in your skills. However, mistakes can lead to fire hazards, water damage, or system failure.
Hire a professional if:
- You’re unsure about electrical connections.
- Your ductwork needs major modifications.
- You want a warranty-covered installation.
- Local codes require licensed technicians.
Many HVAC contractors offer free consultations and can recommend the best unit for your home. The extra cost is often worth the peace of mind and long-term reliability.
Conclusion
Adding a whole house dehumidifier is one of the best investments you can make for your home’s comfort, health, and durability. By controlling indoor humidity, you prevent mold, protect your belongings, and breathe easier.
This guide has walked you through every step—from assessing your needs and choosing the right unit to installing, testing, and maintaining it. While the process requires careful planning and some technical know-how, the results are well worth the effort.
Remember: proper sizing, correct installation, and regular maintenance are the keys to success. Whether you tackle it yourself or hire a pro, a whole house dehumidifier will keep your home dry, fresh, and comfortable for years to come.