

Adding refrigerant to a dehumidifier is a delicate process that requires proper tools, safety precautions, and technical knowledge. This guide walks you through identifying low refrigerant, safely recharging the system, and avoiding common mistakes—only recommended for experienced users or HVAC professionals.
Quick Answers to Common Questions
Tip/Question?
Can I use car AC refrigerant in my dehumidifier?
No. Dehumidifiers use specific refrigerants like R-410A or R-134a. Car systems use R-134a or R-1234yf, but the pressure and oil requirements are different. Never mix refrigerants or use automotive products in home appliances.
Tip/Question?
How often should I clean my dehumidifier’s coils?
Clean the coils every 3–6 months, or more often in dusty environments. Use a soft brush or coil cleaner to remove dirt and debris that can reduce efficiency.
Tip/Question?
Is it safe to run a dehumidifier with a cracked coil?
No. A cracked coil can leak refrigerant and reduce performance. Turn off the unit and contact a technician for repair or replacement.
Tip/Question?
Can low refrigerant cause the dehumidifier to overheat?
Yes. Low refrigerant can cause the compressor to overwork, leading to overheating and potential failure. Shut off the unit if it feels excessively hot.
Tip/Question?
Should I recharge my dehumidifier myself to save money?
Not recommended. The cost of tools, refrigerant, and potential mistakes often exceeds professional service. Plus, you risk injury or environmental harm.
Introduction: Can You Really Add Refrigerant to a Dehumidifier?
You’ve noticed your dehumidifier isn’t pulling moisture from the air like it used to. The room still feels damp, the bucket isn’t filling up, and the unit runs constantly without results. Your first thought might be: “Is the refrigerant low?” And if so, “Can I just add more?”
The short answer? It’s complicated.
While dehumidifiers do use refrigerant—just like air conditioners and refrigerators—adding more isn’t as simple as topping off your car’s oil. In fact, for most homeowners, attempting to recharge a dehumidifier’s refrigerant system is not only risky but often unnecessary. Most performance issues aren’t caused by low refrigerant at all.
In this guide, we’ll walk you through everything you need to know about refrigerant in dehumidifiers: how it works, when (and if) you should consider adding more, the tools and safety steps involved, and why professional help is usually the best route. Whether you’re a DIY enthusiast or just trying to understand your appliance better, this guide will help you make an informed decision.
By the end, you’ll know how to identify real refrigerant issues, safely handle the process if you choose to proceed, and avoid common pitfalls that could damage your unit or put your health at risk.
How Dehumidifiers Use Refrigerant: The Basics
Visual guide about How to Add Refrigerant to a Dehumidifier
Image source: essentialhomeandgarden.com
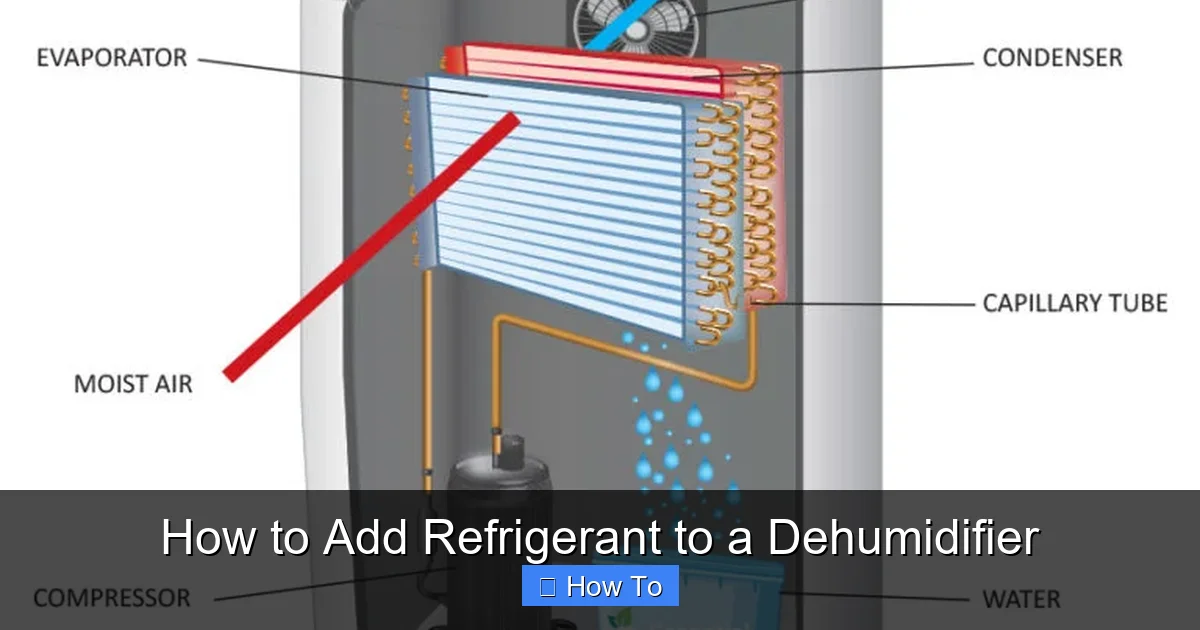
Before you even think about adding refrigerant, it’s important to understand how it works inside your dehumidifier.
Dehumidifiers operate on the same basic principle as air conditioners: they use a refrigeration cycle to cool air, condense moisture, and then reheat the air before releasing it back into the room.
Here’s a simplified breakdown of the process:
- Air intake: A fan pulls humid air from the room into the unit.
- Cooling coil: The air passes over cold evaporator coils filled with refrigerant. As the air cools, moisture condenses into water droplets.
- Water collection: The collected water drips into a bucket or drains out through a hose.
- Reheating: The now-dry air passes over warm condenser coils (also part of the refrigerant system) and is reheated to room temperature.
- Air output: The dry, warm air is blown back into the room.
The refrigerant is the lifeblood of this cycle. It absorbs heat from the air in the evaporator and releases it in the condenser, allowing the system to continuously remove moisture.
Common refrigerants used in modern dehumidifiers include R-410A, R-134a, and sometimes R-22 (though this is being phased out due to environmental concerns).
Signs Your Dehumidifier Might Have a Refrigerant Problem
Not every underperforming dehumidifier has a refrigerant issue. In fact, most don’t. But here are some symptoms that *might* indicate low refrigerant or a refrigerant-related problem:
- Reduced moisture removal: The unit runs but the water bucket fills very slowly or not at all.
- Ice buildup on coils: If the evaporator coils get too cold (often due to low refrigerant), moisture in the air can freeze on them, blocking airflow.
- Unit runs constantly: The dehumidifier never shuts off, even in high humidity.
- Warm air output: The air coming out feels warmer than usual, suggesting the reheating cycle isn’t working properly.
- Unusual noises: Hissing or gurgling sounds could indicate a refrigerant leak.
However, these symptoms can also be caused by:
- Clogged or dirty air filters
- Frozen or blocked coils (from dust or low airflow)
- Faulty fan motor
- Defective humidistat or control board
- Drainage issues (clogged hose or full bucket sensor)
That’s why diagnosis is key. Before assuming it’s a refrigerant issue, try these basic troubleshooting steps:
Step 1: Clean the Air Filter
A dirty filter restricts airflow, which can cause coils to freeze and reduce efficiency. Remove the filter (usually behind a front panel), vacuum or wash it, and let it dry completely before reinserting.
Step 2: Check for Ice on Coils
Turn off the unit and let it sit for 30–60 minutes. If ice melts and the unit starts working again, the issue was likely frozen coils—not low refrigerant. Improve ventilation around the unit and clean the coils with a soft brush.
Step 3: Inspect the Drainage System
Ensure the water bucket is empty and the float switch isn’t stuck. If using a drain hose, check for kinks or clogs.
Step 4: Test the Fan
Listen for the fan running when the unit is on. If it’s not spinning, the motor or capacitor may be faulty.
Only after ruling out these common issues should you consider a refrigerant problem.
Why Adding Refrigerant Is Rarely a DIY Job
Now, let’s address the elephant in the room: Can you safely add refrigerant to a dehumidifier yourself?
The honest answer is: Technically, yes—but it’s not recommended for most people.
Here’s why:
1. Sealed Systems Are Not Designed for Recharging
Most residential dehumidifiers are hermetically sealed systems. That means the compressor, coils, and refrigerant lines are permanently closed. There’s no service port for adding refrigerant—unlike some car AC systems.
To access the refrigerant, you’d need to cut into the system, add a service valve, recharge, and then reseal it. This requires specialized tools and skills.
2. Refrigerant Handling Is Regulated
In the U.S., the Environmental Protection Agency (EPA) regulates refrigerant handling under Section 608 of the Clean Air Act. Only certified technicians can legally purchase and handle certain refrigerants, especially R-410A and R-22.
Violating these rules can result in fines—even for homeowners.
3. Low Refrigerant Usually Means a Leak
Refrigerant doesn’t “run out” like gasoline. It’s a closed loop. If levels are low, there’s almost always a leak.
Simply adding more refrigerant without finding and fixing the leak is a temporary fix. The new refrigerant will eventually escape, and you’ll be back to square one.
4. Risk of Damage or Injury
Refrigerants are under high pressure and can cause frostbite on contact with skin. Inhaling fumes can lead to dizziness, nausea, or worse. Improper handling can also damage the compressor or other components.
5. Warranty and Safety Concerns
Opening the sealed system voids most manufacturer warranties. Plus, if not done correctly, you could create a fire hazard or electrical issue.
When Professional Service Is the Best Option
Given the risks and complexity, here’s when you should call a professional:
- You’ve ruled out all other causes and suspect a refrigerant leak.
- The unit is still under warranty.
- You lack the tools or experience to safely handle refrigerants.
- The dehumidifier is a high-end or energy-efficient model worth repairing.
- You live in a region with strict refrigerant regulations.
A qualified HVAC technician can:
- Use a manifold gauge set to check system pressure.
- Perform a leak test using nitrogen or electronic detectors.
- Repair leaks (e.g., solder joints, O-rings, or damaged coils).
- Safely evacuate and recharge the system with the correct refrigerant.
- Verify performance and ensure compliance with environmental laws.
The cost? Typically $100–$300, depending on the issue and location. While that might seem steep, it’s often cheaper than replacing the entire unit—and far safer than a DIY attempt.
Tools and Materials You’d Need (If Proceeding Anyway)
If you’re an experienced technician or determined DIYer with proper certification, here’s what you’d need to add refrigerant to a dehumidifier:
Essential Tools
- Manifold gauge set: Measures high and low-side pressure.
- Refrigerant scale: Ensures accurate charging by weight.
- Vacuum pump: Removes air and moisture from the system before recharging.
- Refrigerant recovery machine (optional but recommended): Safely removes old refrigerant.
- Refrigerant identifier (optional): Confirms the type of refrigerant in the system.
- Leak detection kit: Electronic sniffer or UV dye to find leaks.
- Welding/soldering tools: For repairing leaks and adding service ports.
- Service valve (Schrader valve): To create a port for charging.
Safety Gear
- Safety goggles
- Nitrile gloves
- Respirator or mask
- Long sleeves and pants
- Work in a well-ventilated area
Refrigerant
You’ll need the exact type specified by the manufacturer. Check the label on the unit or the manual. Never substitute refrigerants—mixing types can cause chemical reactions or system failure.
Step-by-Step: How to Add Refrigerant (For Professionals Only)
Warning: This section is for informational purposes only. We strongly recommend leaving refrigerant work to certified professionals.
If you’re qualified and have the right tools, here’s a general outline of the process:
Step 1: Confirm the Refrigerant Type and Charge Amount
Locate the manufacturer’s label (usually on the back or side of the unit). It will list the refrigerant type (e.g., R-410A) and the required charge in ounces or grams.
Step 2: Locate and Repair Any Leaks
Use a leak detector to find the source. Common leak points include:
- Compressor welds
- Evaporator or condenser coil joints
- Service valves (if present)
- Schrader valve cores
Repair leaks by soldering or replacing damaged parts.
Step 3: Add a Service Port (If None Exists)
Most dehumidifiers don’t have a service port. You’ll need to:
- Cut into the suction line (low-pressure side).
- Install a Schrader valve or piercing valve.
- Solder the connection securely.
Step 4: Evacuate the System
Connect the vacuum pump to the service port and run it for at least 30–60 minutes. This removes air and moisture, which can damage the system.
Step 5: Charge the System
- Connect the refrigerant cylinder to the gauge set.
- Weigh the refrigerant using a scale.
- Add the exact amount specified by the manufacturer.
- Monitor pressure readings to ensure proper charge.
Step 6: Test and Seal
- Run the dehumidifier and check performance.
- Verify moisture removal and airflow.
- Seal all openings and clean up.
Step 7: Dispose of Waste Properly
Any recovered refrigerant must be stored and disposed of according to EPA guidelines. Never release it into the atmosphere.
Troubleshooting Common Issues
Even with the best preparation, things can go wrong. Here’s how to handle common problems:
Problem: Unit Still Not Removing Moisture After Recharge
- Check for remaining leaks.
- Verify the fan is working and coils are clean.
- Ensure the humidistat is set correctly.
- Confirm the refrigerant charge is accurate.
Problem: Ice Builds Up on Coils After Recharge
- Low refrigerant can cause coils to overcool.
- Check for airflow blockages.
- Verify the defrost cycle (if equipped) is functioning.
Problem: Hissing or Bubbling Sounds
- Likely a refrigerant leak.
- Shut off the unit immediately.
- Do not attempt to recharge until the leak is fixed.
Problem: Compressor Won’t Start
- Could be electrical (capacitor, relay, or board).
- Low refrigerant can cause compressor protection to kick in.
- Test with a multimeter or call a technician.
When to Replace Instead of Repair
Sometimes, the smartest move is to replace your dehumidifier rather than repair it.
Consider replacement if:
- The unit is over 7–10 years old.
- Repair costs exceed 50% of a new unit’s price.
- The compressor is damaged (expensive to replace).
- Energy efficiency is poor (older models use more electricity).
- You want smart features (Wi-Fi, auto-humidistat, continuous drain).
Newer models are quieter, more efficient, and often come with better warranties. Plus, you avoid the hassle and risk of refrigerant work.
Conclusion: Think Twice Before Adding Refrigerant
Adding refrigerant to a dehumidifier is not a typical home repair. It’s a complex, regulated process that should only be handled by trained professionals. Most performance issues can be resolved with simple cleaning, filter changes, or electrical fixes—not refrigerant recharging.
If your dehumidifier isn’t working, start with basic troubleshooting. Clean the filter, check for ice, and inspect the fan and drainage. Only if those steps fail—and you suspect a refrigerant leak—should you consider professional service.
Remember: Safety, legality, and long-term reliability should always come first. When in doubt, call an expert. Your health, your home, and the environment will thank you.