
Discover how to build a dehumidifier at home using everyday items like salt, buckets, and fans. This budget-friendly DIY project helps reduce indoor humidity, prevent mold, and improve air quality without expensive equipment.
Quick Answers to Common Questions
Can I use table salt instead of rock salt?
Yes, but rock salt or calcium chloride works better. Table salt has additives that reduce absorption, so it’s less effective for dehumidifying.
How often should I empty the water collection bucket?
Check every 2–3 days. In very humid conditions, you may need to empty it daily to prevent overflow.
Will a DIY dehumidifier work in a basement?
It can help in small, enclosed basement areas, but for large or chronically damp basements, a commercial unit is more effective.
Can I leave the fan-powered dehumidifier running overnight?
It’s safe for short periods, but avoid leaving it unattended for long. Use a timer or smart plug to control operation.
How do I know if my DIY dehumidifier is working?
Use a hygrometer to measure humidity before and after use. A drop of 5–10% indicates it’s working.
How to Build a Dehumidifier at Home
High humidity at home can lead to musty smells, peeling paint, and even health issues like allergies or asthma. While store-bought dehumidifiers are effective, they can be expensive and use a lot of electricity. The good news? You can build a dehumidifier at home using simple, affordable materials you probably already have. Whether you’re dealing with a damp basement, a sweaty bathroom, or a humid closet, this DIY guide will show you how to create a functional dehumidifier without breaking the bank.
In this guide, you’ll learn three practical methods to build a dehumidifier at home: a salt-based passive unit, a fan-powered condensation model, and a reusable silica gel version. Each method is easy to assemble, uses common household items, and can significantly reduce moisture in small spaces. By the end, you’ll understand how dehumidification works, which design suits your needs, and how to maintain your homemade unit for long-term use.
Why Build a Dehumidifier at Home?
Before diving into the build, it’s important to understand why you might want to make your own dehumidifier. Commercial units can cost anywhere from $50 to $300, and larger models consume significant electricity. In contrast, a DIY dehumidifier costs just a few dollars and uses minimal or no power. They’re perfect for small, enclosed areas where moisture tends to build up—like closets, RVs, storage sheds, or under sinks.

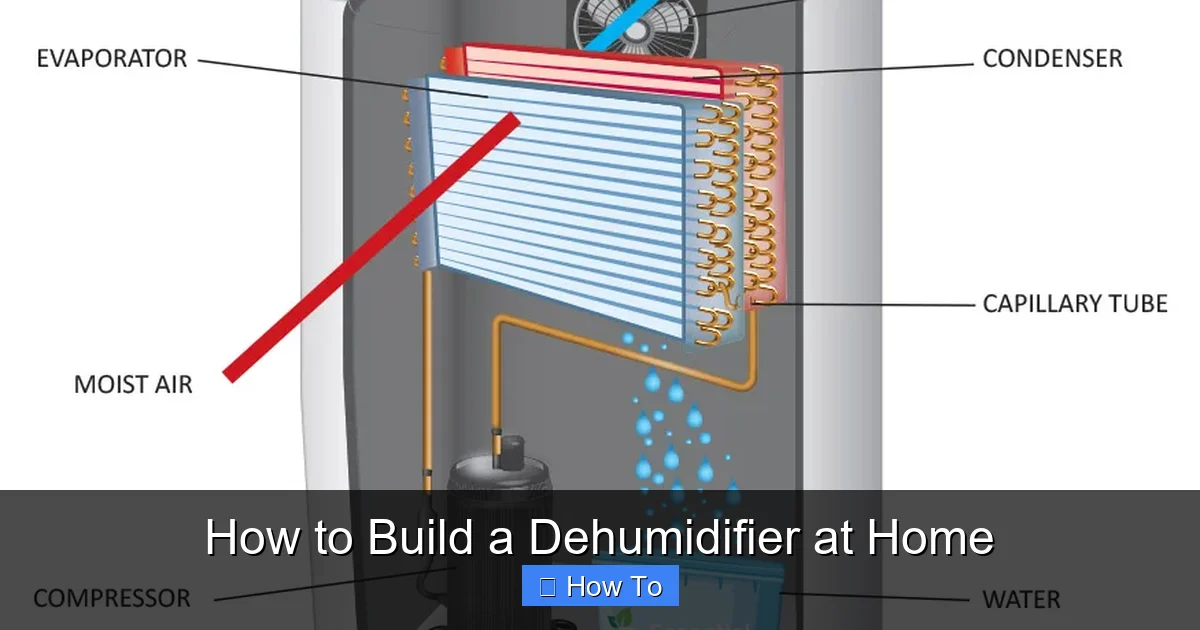
Visual guide about How to Build a Dehumidifier at Home
Image source: homeisd.com
Additionally, homemade dehumidifiers are eco-friendly. Many use natural desiccants like salt or silica gel, which can often be dried and reused. They also reduce reliance on plastic-heavy appliances and help you repurpose items you already own. Plus, building one yourself gives you a sense of accomplishment and control over your indoor environment.
While DIY models won’t replace heavy-duty dehumidifiers for large, chronically damp spaces, they’re excellent for spot treatment and preventive care. If you’re looking for a low-cost, sustainable way to fight humidity, building a dehumidifier at home is a smart and practical solution.
Understanding How Dehumidifiers Work
To build an effective dehumidifier, it helps to know the science behind it. Humidity is the amount of water vapor in the air. When air becomes saturated—meaning it holds as much moisture as it can—water condenses into liquid, leading to dampness, mold, and mildew. Dehumidifiers work by removing this excess moisture.
There are two main types of dehumidification: condensation and absorption. Condensation-based units cool the air below its dew point, causing water to drip into a collection tray—this is how most electric dehumidifiers work. Absorption-based units use desiccants (moisture-absorbing materials) like salt or silica gel to pull water from the air.
Your homemade dehumidifier will likely use one or both of these methods. For example, a salt bucket dehumidifier relies on absorption, while a fan-and-ice setup uses condensation. Understanding these principles will help you troubleshoot and improve your design.
Method 1: The Salt Bucket Dehumidifier
This is the simplest and most popular DIY dehumidifier. It uses rock salt (sodium chloride) or calcium chloride to absorb moisture from the air. Calcium chloride is more effective, but both work well. This method is passive—no electricity needed—making it ideal for closets, cabinets, or storage areas.
What You’ll Need
- Two 5-gallon buckets (or large plastic containers)
- Drill with a 1/4-inch bit
- Rock salt or calcium chloride (available at hardware or grocery stores)
- Cheesecloth or fine mesh (optional, to prevent salt spillage)
- Hygrometer (to measure humidity)
Step-by-Step Instructions
Step 1: Prepare the Inner Bucket
Take one bucket and drill 10–15 small holes (about 1/4 inch) in the bottom. These holes allow air to pass through while keeping the salt contained. If you’re using cheesecloth, line the bottom of the bucket with it before adding salt to prevent grains from falling through.
Step 2: Add the Desiccant
Fill the perforated bucket with 2–3 pounds of rock salt or calcium chloride. Calcium chloride works faster and absorbs more moisture, so it’s preferred if available. Don’t overfill—leave about 2 inches of space at the top.
Step 3: Place Inside the Outer Bucket
Set the perforated bucket inside the second, solid bucket. The outer bucket will collect the water that drips from the salt as it absorbs moisture. Make sure the inner bucket sits securely and doesn’t tip over.
Step 4: Position in a Humid Area
Place your dehumidifier in a damp spot—like a closet, under the sink, or in a basement corner. Avoid placing it near electronics or wooden furniture that could be damaged by dripping water.
Step 5: Monitor and Maintain
Check the outer bucket every few days. You’ll notice water collecting at the bottom. Empty it regularly to prevent overflow. The salt will eventually dissolve or become saturated. Replace it every 2–4 weeks, depending on humidity levels.
Tips for Best Results
- Use calcium chloride for faster moisture absorption.
- Place a tray under the bucket for extra protection against leaks.
- Keep the area well-ventilated to help air circulate around the unit.
- Use a hygrometer to track humidity and know when to replace the salt.
Method 2: The Fan-Powered Condensation Dehumidifier
If you want a more active solution, this method uses a small fan and ice to cool the air and condense moisture. It mimics how electric dehumidifiers work but uses minimal power. This setup is great for slightly larger spaces like bathrooms or small basements.
What You’ll Need
- Small box fan or USB fan
- Large plastic storage bin or cooler
- Ice cubes or frozen water bottles
- Metal baking sheet or aluminum tray
- Duct tape or zip ties
- Towel or sponge (for spill protection)
Step-by-Step Instructions
Step 1: Prepare the Container
Choose a plastic bin large enough to hold the fan and ice. A 10–20 gallon storage bin works well. Make sure it has a lid or can be covered partially.
Step 2: Position the Fan
Place the fan on top of the bin, facing downward. Use duct tape or zip ties to secure it so it blows air into the container. If using a USB fan, plug it into a power bank or wall adapter.
Step 3: Add Ice and a Drip Tray
Place a metal baking sheet or aluminum tray at the bottom of the bin. This will catch condensation. Add a layer of ice cubes or frozen water bottles on top of the tray. The colder the surface, the more moisture will condense.
Step 4: Cover and Direct Airflow
Partially cover the top of the bin with a lid or plastic wrap, leaving a small opening for air to escape. This creates a closed loop: the fan pulls humid air down, it cools over the ice, moisture condenses and drips into the tray, and drier air exits through the opening.
Step 5: Place in a Humid Room
Set the unit in a room with high humidity. Run it for a few hours at a time. You’ll see water collecting in the tray within 30–60 minutes.
Tips for Best Results
- Use frozen water bottles instead of ice cubes—they last longer and won’t dilute as quickly.
- Replace ice every 2–4 hours for continuous operation.
- Place a towel under the bin to catch any spills.
- Run the fan on low to save energy and reduce noise.
Method 3: The Silica Gel Rechargeable Dehumidifier
Silica gel is a highly effective desiccant often found in packaging (those “do not eat” packets). While small packets aren’t enough, you can buy bulk silica gel online or reuse large quantities from shoeboxes or electronics packaging. This method is reusable and chemical-free.
What You’ll Need
- Bulk silica gel beads (available online or from craft stores)
- Two breathable fabric pouches or mesh bags
- Airtight plastic container with lid
- Oven or microwave (for recharging)
- Hygrometer
Step-by-Step Instructions
Step 1: Fill the Pouches
Place 1–2 cups of silica gel beads into each fabric pouch. Use breathable material like cotton or mesh so air can pass through but beads stay contained.
Step 2: Place in the Container
Put the pouches inside the airtight plastic container. Leave the lid off for now. The silica gel will start absorbing moisture from the air.
Step 3: Position in a Damp Area
Place the open container in a humid spot—like a bathroom shelf or closet. The silica gel will gradually pull moisture from the air.
Step 4: Recharge the Gel
After 1–2 weeks, the gel will become saturated. To recharge, spread the beads on a baking sheet and heat in the oven at 250°F (120°C) for 2–3 hours. Alternatively, microwave in 30-second intervals until dry (watch carefully to avoid overheating). Let cool before reusing.
Step 5: Seal and Store
Once recharged, place the dry beads back in the pouches and store them in the airtight container with the lid on. This keeps them ready for future use.
Tips for Best Results
- Label the container “Silica Gel – Do Not Eat” for safety.
- Use a hygrometer to know when the gel is saturated (humidity stops dropping).
- Recharge every 1–2 weeks in high-humidity areas.
- Store recharged gel in an airtight bag between uses.
Troubleshooting Common Issues
Even the best DIY dehumidifiers can run into problems. Here’s how to fix common issues:
Water Overflowing from the Bucket
If your salt bucket is overflowing, you’re likely in a very humid environment or using too much salt. Reduce the amount of salt and check the bucket daily. Consider using a larger outer container or placing a drip tray underneath.
No Water Collecting
If no water appears, the air might not be humid enough, or the desiccant may be saturated. Check the hygrometer—if humidity is below 50%, a dehumidifier may not be needed. Replace the salt or silica gel if it’s old or wet.
Fan Not Working or Overheating
Ensure the fan is plugged in and not blocked. If it overheats, turn it off and let it cool. Use a lower-speed setting or a fan with thermal protection.
Ice Melting Too Fast
In warm rooms, ice melts quickly. Use frozen water bottles instead of loose ice, or run the unit for shorter periods. You can also add salt to the ice to lower its melting point and extend cooling time.
Unpleasant Odors
If your dehumidifier starts smelling musty, mold may be growing in the container. Clean the buckets with vinegar and water, and ensure the area is well-ventilated. Replace any wet fabric or mesh.
Safety Tips and Best Practices
While DIY dehumidifiers are generally safe, follow these guidelines to avoid accidents:
- Keep electrical components (like fans) away from water. Use battery-powered or USB fans when possible.
- Never leave a running fan unattended for long periods.
- Store silica gel out of reach of children and pets—it’s non-toxic but not meant for consumption.
- Use gloves when handling calcium chloride, as it can irritate skin.
- Place units on stable, flat surfaces to prevent tipping.
- Regularly clean containers to prevent mold or bacteria growth.
When to Upgrade to a Commercial Dehumidifier
DIY dehumidifiers are great for small spaces and mild humidity, but they have limits. Consider buying a commercial unit if:
- Your home has persistent dampness or mold.
- Humidity levels stay above 60% despite DIY efforts.
- You need to dehumidify a large area (over 100 square feet).
- You have health conditions worsened by mold or dust mites.
Commercial dehumidifiers are more powerful, energy-efficient, and come with features like auto-shutoff and humidity controls. But for spot treatment and budget-friendly solutions, homemade units are a fantastic first step.
Conclusion
Building a dehumidifier at home is a smart, sustainable way to fight excess moisture without spending a lot of money. Whether you choose the salt bucket method, the fan-and-ice condensation model, or the reusable silica gel pouch, you’ll have a functional tool to improve air quality and protect your belongings.
These DIY solutions are easy to assemble, use everyday materials, and can be customized to fit your space. With regular maintenance and a little creativity, your homemade dehumidifier can make a big difference in comfort and cleanliness. So grab a bucket, some salt, and start building—your home will thank you.