
This guide walks you through how to check dehumidifier compressor performance, identify common problems, and perform basic diagnostics. You’ll learn safe testing methods, tools needed, and when to call a professional.
Quick Answers to Common Questions
Tip/Question?
Can I test the compressor without a multimeter?
While you can listen for sounds and feel for warmth, a multimeter is essential for accurate diagnosis. Borrow or buy an inexpensive one—it’s a worthwhile investment for home repairs.
Tip/Question?
How often should I check my dehumidifier compressor?
You don’t need to check it regularly unless performance drops. However, annual maintenance (cleaning filters and coils) helps prevent compressor strain.
Tip/Question?
Is it safe to run a dehumidifier with a faulty compressor?
No. A failing compressor can overheat, cause electrical shorts, or lead to refrigerant leaks. Unplug the unit immediately if you suspect a problem.
Tip/Question?
Can a bad capacitor mimic compressor failure?
Yes! A failed start capacitor is a common cause of compressor startup issues. Always test the capacitor before assuming the compressor is bad.
Tip/Question?
Should I replace the entire dehumidifier or just the compressor?
In most cases, replacing the whole unit is more cost-effective. Compressor repairs are complex and often not worth the labor cost.
How to Check Dehumidifier Compressor: A Complete Step-by-Step Guide
If your dehumidifier isn’t removing moisture from the air like it used to, the compressor might be the culprit. The compressor is the heart of your dehumidifier—it circulates refrigerant through the system, enabling the unit to cool the coils and extract water from the air. When it fails, your dehumidifier essentially becomes a noisy fan with no drying power.
In this comprehensive guide, you’ll learn how to check dehumidifier compressor performance safely and effectively. We’ll walk you through visual inspections, sound checks, temperature monitoring, and electrical testing using common tools like a multimeter. Whether you’re a DIY enthusiast or just trying to avoid an expensive service call, this guide will help you diagnose compressor issues with confidence.
By the end, you’ll know whether your compressor is working, what signs point to failure, and when it’s time to replace the unit or call in a professional. Let’s get started!
Why the Compressor Matters in a Dehumidifier
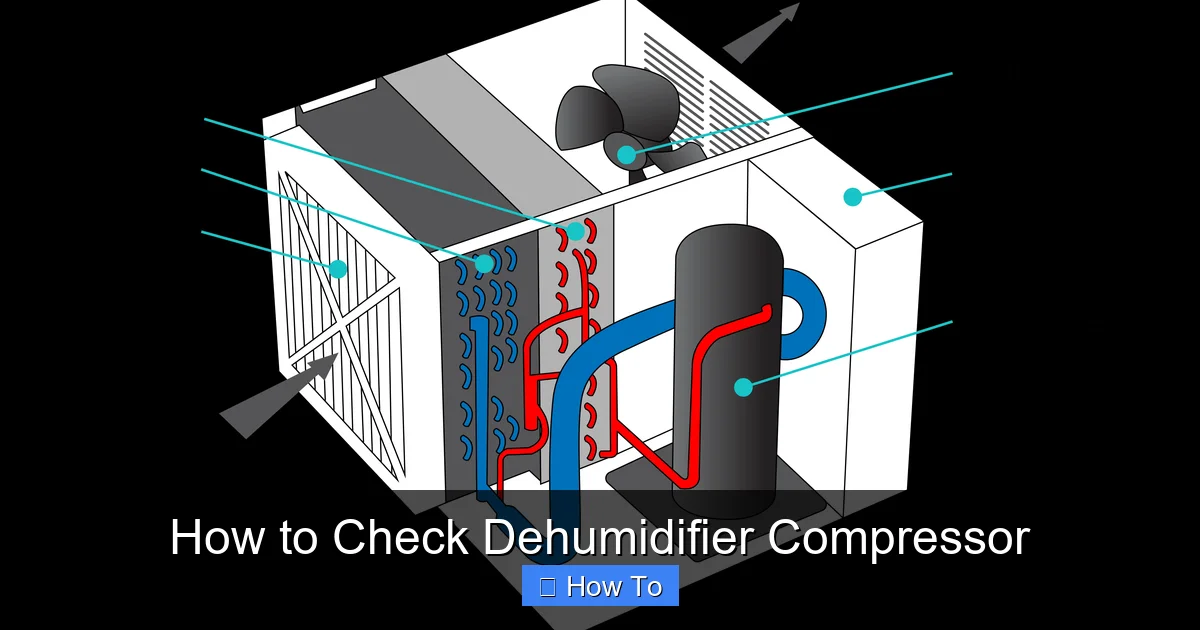
Visual guide about How to Check Dehumidifier Compressor
Image source: surna.com
Before diving into diagnostics, it’s important to understand the compressor’s role. Unlike air conditioners or refrigerators, dehumidifiers use a closed-loop refrigeration system to remove moisture. Here’s how it works:
– Warm, humid air is drawn into the unit by a fan.
– The air passes over cold evaporator coils, causing moisture to condense into water droplets.
– The water collects in a tank or drains out via a hose.
– The now-cool, dry air passes over hot condenser coils (heated by the compressor) and is released back into the room.
The compressor drives this cycle by pressurizing refrigerant gas, raising its temperature and enabling heat exchange. Without a functioning compressor, the refrigerant doesn’t circulate, the coils don’t get cold, and no moisture is removed.
So if your dehumidifier is running but the humidity level isn’t dropping, the compressor is one of the first components to investigate.
Tools and Safety Precautions
Before you begin, gather the right tools and prioritize safety. Working with electrical components can be dangerous if done improperly.
Essential Tools
- Multimeter: Used to test continuity, resistance, and voltage. A digital multimeter with a continuity beep function is ideal.
- Screwdrivers: Phillips and flathead screwdrivers to remove access panels.
- Insulated gloves: Protect your hands from sharp edges and electrical hazards.
- Safety goggles: Prevent debris or refrigerant exposure to your eyes.
- Flashlight: Helps illuminate tight spaces inside the unit.
- Needle-nose pliers: Useful for disconnecting wires carefully.
Safety First: Critical Precautions
- Unplug the unit: Always disconnect the dehumidifier from the power outlet before opening it. Never work on a plugged-in appliance.
- Discharge capacitors: Some dehumidifiers have capacitors that store electrical charge even when unplugged. Use an insulated screwdriver to short the terminals (touch both with the metal shaft) to discharge them safely.
- Avoid refrigerant exposure: If you suspect a refrigerant leak, do not attempt to repair it yourself. Refrigerants can be harmful if inhaled or exposed to skin. Contact a licensed HVAC technician.
- Work in a dry area: Moisture increases the risk of electric shock. Choose a clean, dry workspace.
- Take photos: Before disconnecting wires, snap pictures of the wiring layout to help with reassembly.
Step 1: Observe the Dehumidifier in Operation
Start with a simple observation. Turn on the dehumidifier and let it run for 10–15 minutes. Pay attention to:
Sound
A healthy compressor produces a steady, low humming sound. Listen closely near the back or bottom of the unit where the compressor is usually located.
– Normal: Soft, consistent hum.
– Clicking repeatedly: Could indicate a faulty start relay or capacitor.
– Loud buzzing or grinding: Suggests internal mechanical damage or seized components.
– Complete silence: The compressor isn’t receiving power or has failed.
Airflow and Cooling
Feel the air coming out of the front and back vents.
– The front (intake) should feel warm or room temperature.
– The back (exhaust) should feel slightly cooler.
If both sides feel the same temperature, the refrigeration cycle isn’t working—likely due to compressor failure.
Compressor Temperature
Carefully touch the compressor housing (usually a black or silver cylindrical component). It should be warm to the touch—typically between 120°F and 150°F (49°C–66°C).
– Too hot (burning smell or over 180°F): Overheating due to blocked airflow, low refrigerant, or electrical issues.
– Cold or room temperature: The compressor isn’t running or isn’t compressing refrigerant.
Step 2: Perform a Visual Inspection
Turn off and unplug the dehumidifier. Remove the outer casing using your screwdriver. Most models have side or rear panels held by 4–6 screws.
Look for Physical Damage
Inspect the compressor and surrounding components:
– Burn marks or melted wiring: Indicates electrical overload or short circuit.
– Oil stains or leaks: Refrigerant leaks often leave oily residue around seals or connections.
– Rust or corrosion: Suggests long-term moisture exposure—common in basements.
– Loose or frayed wires: Can prevent proper power delivery.
Check the Start Relay and Capacitor
These components help the compressor start and run. They’re often located near the compressor and connected by wires.
– The start relay is a small plastic or ceramic component with two or three wires.
– The capacitor is a cylindrical or oval-shaped part, sometimes bulging or leaking.
A failed relay or capacitor can prevent the compressor from starting, even if the compressor itself is fine. Replace these parts if they show signs of damage.
Step 3: Test the Compressor with a Multimeter
This is the most accurate way to check if the compressor is electrically functional.
Set Up Your Multimeter
– Turn the multimeter dial to the resistance (ohms) setting, usually marked with the Ω symbol.
– If your multimeter has a continuity test mode (beep symbol), use that for faster results.
Locate the Compressor Terminals
The compressor has three electrical terminals, usually labeled:
– C (Common)
– S (Start)
– R (Run)
These are connected via wires from the relay and capacitor. You may need to disconnect the wires to test properly.
Test for Continuity
Place the multimeter probes on the terminals and check for continuity:
1. Test C to S: Should show low resistance (2–20 ohms). No continuity means an open circuit—compressor likely failed.
2. Test C to R: Should also show low resistance.
3. Test S to R: Should show higher resistance (sum of C-S and C-R).
If any pair shows infinite resistance (OL on the display), the compressor windings are open and the unit needs replacement.
Check for Ground Fault
Place one probe on a terminal (C, S, or R) and the other on the compressor metal casing.
– No continuity (infinite resistance): Normal—no short to ground.
– Continuity (beep or low resistance): The windings are shorted to the casing—compressor is faulty.
Step 4: Verify Power Supply to the Compressor
Even if the compressor is good, it won’t run without proper power.
Check Voltage at the Terminals
– Reconnect the wires to the compressor.
– Plug in the dehumidiator (but don’t turn it on yet).
– Set your multimeter to AC voltage (V~).
– Carefully place probes on the C and R terminals.
– Turn on the unit and listen for the compressor attempt to start.
You should see voltage close to your home’s standard (120V in the U.S.). If voltage is present but the compressor doesn’t run, the issue is likely internal.
Test the Thermostat and Humidistat
These controls tell the compressor when to turn on. If they’re faulty, the compressor won’t receive the signal to start.
– Use the multimeter to test continuity across the thermostat terminals when the unit is set to “on” and humidity is high.
– No continuity means the thermostat isn’t closing the circuit—replace it.
Step 5: Assess Refrigerant Levels (Indirectly)
You can’t safely measure refrigerant without specialized tools, but you can look for signs of low charge:
– Ice buildup on evaporator coils: Caused by low refrigerant or restricted airflow.
– Compressor runs continuously but doesn’t cool: Suggests refrigerant leak.
– Hissing or bubbling sounds: Possible leak in the system.
If you suspect a refrigerant issue, contact a licensed technician. DIY refrigerant handling is illegal in many areas and requires certification.
Troubleshooting Common Compressor Issues
Compressor Won’t Start
- Cause: Faulty start relay, capacitor, or thermostat.
- Solution: Replace the defective component. These are inexpensive and easy to swap.
Compressor Starts but Stops Quickly
- Cause: Overheating due to dirty coils, blocked airflow, or low refrigerant.
- Solution: Clean the coils and filters. Ensure proper ventilation around the unit.
Compressor Makes Loud Noises
- Cause: Internal mechanical failure, loose mounting, or refrigerant floodback.
- Solution: If tightening mounts doesn’t help, the compressor likely needs replacement.
Compressor Runs but No Dehumidification
- Cause: Refrigerant leak, clogged coils, or faulty fan.
- Solution: Clean coils and check fan operation. If no improvement, suspect refrigerant loss.
When to Replace vs. Repair
Compressors are expensive to repair—often costing 50–70% of a new unit’s price. Consider replacement if:
– The compressor fails electrical tests.
– There’s a refrigerant leak.
– The unit is over 5–7 years old.
– Repair costs exceed half the price of a new dehumidifier.
Newer models are more energy-efficient and may save you money on electricity bills. Look for ENERGY STAR-certified units with good warranties.
Preventative Maintenance Tips
Keep your dehumidifier running smoothly with regular care:
– Clean the air filter monthly: A clogged filter restricts airflow, forcing the compressor to work harder.
– Vacuum coils and vents: Dust buildup reduces efficiency.
– Empty the water tank regularly: Prevents overflow and strain on the system.
– Use a surge protector: Protects against power spikes that can damage electronics.
– Store properly in winter: Clean and dry the unit before storing to prevent mold and corrosion.
Conclusion
Knowing how to check dehumidifier compressor performance empowers you to diagnose problems early and avoid unnecessary replacements. By following this guide—starting with observation, moving to visual inspection, and finishing with multimeter testing—you can determine whether the compressor is working or needs attention.
Remember: safety is paramount. Always unplug the unit, discharge capacitors, and avoid handling refrigerants yourself. If you’re unsure or encounter complex issues, consult a professional technician.
With proper care and timely diagnostics, your dehumidifier can keep your home comfortable and moisture-free for years to come.