

Cleaning your dehumidifier coil is essential for maintaining optimal performance and energy efficiency. This guide walks you through the entire process, from preparation to reassembly, with safety tips and troubleshooting advice. Regular coil maintenance can prevent costly repairs and improve air quality.
Quick Answers to Common Questions
Can I use a pressure washer to clean the coils?
No, never use a pressure washer or high-pressure water spray. The force can bend the delicate fins and damage internal components. Stick to gentle brushing and low-pressure rinsing.
How do I know if my coils are really dirty?
Signs include reduced moisture removal, longer run times, frost on the coils, or a musty smell. Visually inspect the coils—if they’re gray, green, or clogged with dust, it’s time to clean.
Is it safe to clean coils with vinegar?
Yes, white vinegar is safe and effective for killing mold and mildew on dehumidifier coils. It’s non-toxic, biodegradable, and won’t harm aluminum or copper components when used properly.
What if I can’t access the coils?
Some compact models have sealed cabinets. If you can’t remove panels, use a vacuum with a narrow attachment to clean through the air intake. For deep cleaning, consider professional service.
Can dirty coils cause the unit to overheat?
Yes, blocked coils reduce heat exchange, causing the compressor to overwork and potentially overheat. This can trigger safety shutoffs or lead to permanent damage if ignored.
How to Clean a Dehumidifier Coil: A Complete Step-by-Step Guide
If your dehumidifier isn’t pulling moisture from the air like it used to, or if it’s running longer than usual, the culprit might be dirty coils. Over time, dust, lint, and mold can accumulate on the evaporator and condenser coils, reducing efficiency and potentially damaging the unit. Fortunately, cleaning a dehumidifier coil is a straightforward task that most homeowners can handle with basic tools and a little patience.
In this comprehensive guide, you’ll learn exactly how to clean a dehumidifier coil safely and effectively. We’ll walk you through each step—from turning off the unit to reassembling it—and share expert tips to keep your dehumidifier running smoothly for years. Whether you’re dealing with a small portable model or a larger whole-house system, these instructions apply to most standard dehumidifiers.
Why Cleaning the Coil Matters
The coils in your dehumidifier are the heart of its operation. The evaporator coil cools the air, causing moisture to condense and drip into the collection tank. The condenser coil then reheats the air before it’s released back into the room. When these coils get clogged with dirt or mold, the entire process slows down.
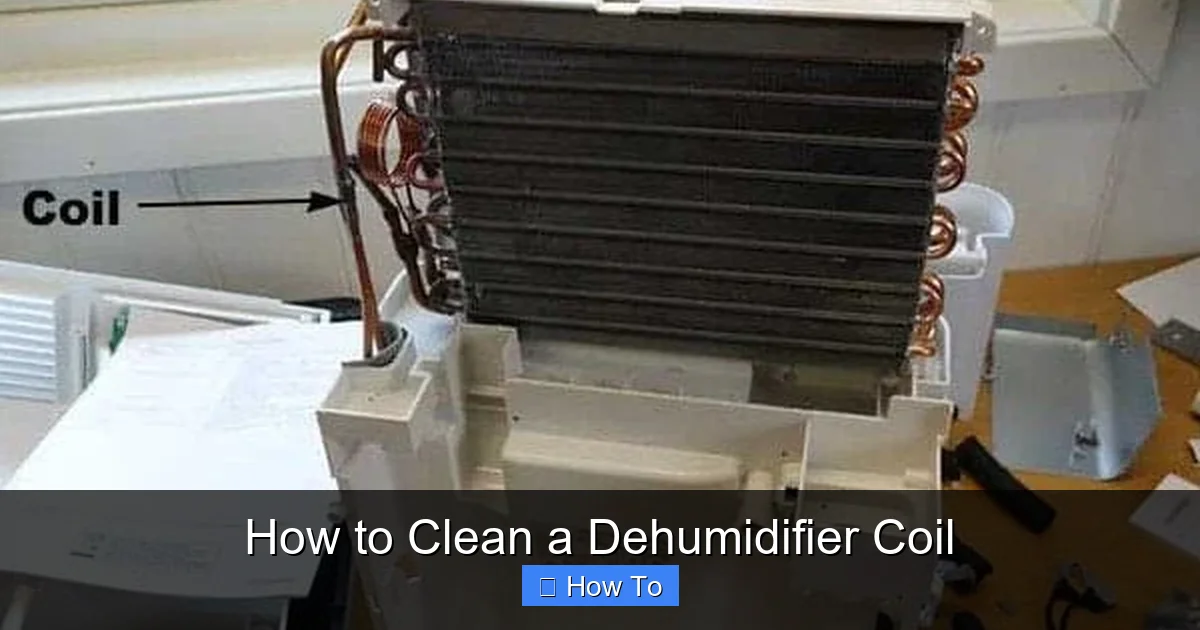
Visual guide about How to Clean a Dehumidifier Coil
Image source: thedehumidifierexperts.com
Dirty coils force the compressor to work harder, increasing energy consumption and wear on the system. In extreme cases, blocked coils can cause the unit to freeze up or shut down entirely. Regular cleaning not only restores performance but also extends the lifespan of your appliance and improves indoor air quality by reducing mold and bacteria buildup.
Tools and Supplies You’ll Need
Before you begin, gather the following items to make the process quick and safe:
- Soft-bristle brush (a coil brush or old toothbrush works well)
- Vacuum cleaner with a brush attachment
- Mild dish soap or coil cleaner spray
- White vinegar (for mold or mildew)
- Clean cloths or microfiber towels
- Bucket of warm water
- Screwdriver (Phillips or flathead, depending on your model)
- Rubber gloves (optional, but recommended)
- Safety goggles (to protect eyes from dust and cleaning solutions)
Having everything ready beforehand saves time and prevents interruptions during the cleaning process.
Step 1: Turn Off and Unplug the Dehumidifier
Safety always comes first. Before touching any part of the unit, make sure it’s completely powered down. Start by turning off the dehumidifier using the control panel or power button. Then, unplug it from the electrical outlet. This step is non-negotiable—even if the unit appears off, residual power could pose a risk.
Wait Before Proceeding
Give the dehumidifier at least 15–30 minutes to cool down if it’s been running recently. The coils and compressor can get very hot during operation, and handling them while warm increases the risk of burns or damage.
Move to a Well-Ventilated Area
If possible, take the dehumidifier to a garage, basement, or outdoor space with good airflow. Cleaning can release dust and mold spores into the air, so working in a ventilated area protects your lungs and prevents recontamination of your living space.
Step 2: Remove the Front Panel or Access Cover
Most dehumidifiers have a front grille or panel that covers the air intake and filter. This panel is usually held in place by clips or screws. Use a screwdriver to remove any screws, or gently press the clips to release the cover.
Locate the Air Filter
Once the panel is off, you’ll see the air filter—a mesh or foam screen that traps large particles before they reach the coils. Remove the filter and set it aside. We’ll clean it separately in a later step.
Identify the Coil Access Point
Behind the filter, you should now see the evaporator coil—a series of thin, finned metal tubes. On some models, you may need to remove an additional internal panel to access both the evaporator and condenser coils. Consult your user manual if you’re unsure. If you don’t have the manual, search online using your model number—most manufacturers provide free PDF copies.
Step 3: Vacuum Loose Debris from the Coils
Before applying any liquid cleaner, use your vacuum’s brush attachment to gently remove surface dust and loose debris. Start at the top of the coil and work your way down, using slow, sweeping motions.
Be Gentle with the Fins
The aluminum fins on the coils are thin and easily bent. Avoid pressing too hard or using a stiff brush, as bent fins can block airflow and reduce efficiency. If you notice bent fins, use a fin comb (available at hardware stores) to straighten them carefully.
Vacuum Both Sides
If you can access the back or interior side of the coil, vacuum that area too. Dust often accumulates on the backside, especially in units that run continuously.
Step 4: Prepare the Cleaning Solution
For light dirt and dust, a simple soap-and-water mixture works well. Mix a few drops of mild dish soap into a bucket of warm water. For heavier buildup or mold, use a commercial coil cleaner spray or a 50/50 solution of white vinegar and water.
Why Vinegar Works
Vinegar is a natural disinfectant that kills mold and mildew without harsh fumes. It’s safe for most coil materials and breaks down organic residue effectively. Avoid bleach or ammonia-based cleaners—they can corrode metal and release toxic gases when mixed with other substances.
Test on a Small Area First
If you’re using a new cleaner, apply a small amount to an inconspicuous part of the coil and wait a few minutes. If there’s no discoloration or damage, proceed with full cleaning.
Step 5: Clean the Coils Thoroughly
Dip your soft-bristle brush into the cleaning solution and gently scrub the coil surfaces. Focus on areas with visible dirt, mold, or discoloration. Work in sections, rinsing the brush frequently to avoid spreading grime.
Use a Spray Bottle for Even Coverage
For coil cleaner sprays or vinegar solution, transfer the liquid to a spray bottle. Lightly mist the coils, then let the solution sit for 5–10 minutes to penetrate stubborn buildup. This dwell time helps loosen dirt without aggressive scrubbing.
Clean Between the Fins
Dust and mold often hide deep between the fins. Use the tip of the brush or a soft cloth wrapped around a flat tool (like a butter knife) to reach tight spaces. Be patient—rushing can damage the delicate structure.
Rinse with Water (If Safe)
Some coil cleaners are “no-rinse,” but if you used soap or vinegar, you may want to rinse the coils. Use a spray bottle with clean water or a damp cloth to wipe away residue. Avoid spraying water directly into electrical components or the motor area.
Step 6: Clean the Air Filter
While the coils are drying, clean the air filter. Rinse it under warm water to remove dust and debris. For stubborn grime, soak it in soapy water for 10–15 minutes, then rinse thoroughly.
Let the Filter Dry Completely
Never reinstall a wet filter—it can promote mold growth and restrict airflow. Place the filter on a clean towel and let it air-dry for at least an hour.
Replace if Necessary
If the filter is torn, brittle, or heavily stained, it’s time for a replacement. Most filters are washable, but they degrade over time. Check your user manual for the recommended replacement schedule.
Step 7: Inspect and Clean Other Components
While the unit is open, take the opportunity to check other parts for dirt or damage.
Check the Drain Hose
Locate the drain hose (usually at the back or bottom of the unit). Disconnect it and flush it with water to remove clogs. A blocked hose can cause water to back up and leak.
Examine the Fan Blades
Use a cloth or brush to wipe dust from the fan blades. A dirty fan reduces airflow and strains the motor.
Look for Mold or Leaks
Inspect the interior cabinet and water tank for signs of mold, rust, or standing water. Wipe affected areas with a vinegar solution and dry thoroughly.
Step 8: Reassemble the Dehumidiator
Once all parts are clean and completely dry, it’s time to put everything back together.
Reinstall the Coils and Panels
Carefully replace any internal panels or covers you removed. Make sure all screws are tightened securely but not over-tightened, which can strip threads.
Reattach the Air Filter and Front Panel
Slide the clean, dry filter back into place. Reattach the front grille or cover, ensuring all clips or screws are fastened.
Double-Check Connections
Before plugging in the unit, verify that all hoses, filters, and panels are properly seated. A loose connection can cause leaks or poor performance.
Step 9: Test the Unit
Plug the dehumidifier back in and turn it on. Set it to a low humidity level (around 45–50%) and listen for normal operation. The fan should run smoothly, and you should feel cool air entering and warm air exiting.
Monitor for the First Hour
Watch for unusual noises, leaks, or error codes. If the unit doesn’t start or shuts off immediately, unplug it and recheck your assembly.
Check the Water Tank
After a few hours of operation, check if water is collecting in the tank. If not, the coils may still be dirty or frozen—repeat the cleaning process or consult a technician.
Troubleshooting Common Issues
Even after cleaning, some problems may persist. Here’s how to address common issues:
Unit Won’t Turn On
Double-check that it’s plugged in and the power outlet is working. If the unit has a reset button, press it. If it still doesn’t start, there may be an internal electrical issue requiring professional repair.
Coils Are Frozen
Frozen coils often result from restricted airflow or low refrigerant. Ensure the filter and coils are clean, and the room temperature is above 65°F (18°C). If freezing continues, the unit may need a refrigerant recharge.
Water Leaking from the Unit
Check that the drain hose isn’t kinked or clogged. Make sure the water tank is properly seated and not cracked. If the leak persists, inspect the condensate pump (if equipped).
Unusual Odors
A musty smell indicates mold inside the unit. Clean all components with vinegar and run the dehumidifier with the door open for a few hours to air it out.
Reduced Moisture Removal
If the unit runs but doesn’t remove much water, the coils may need deeper cleaning or the refrigerant level may be low. Consider professional servicing.
How Often Should You Clean the Coil?
For most homes, cleaning the dehumidifier coil every 3–6 months is sufficient. However, frequency depends on usage and environment.
- High-humidity areas (basements, crawl spaces): Clean every 2–3 months.
- Heavy usage (running 24/7): Inspect and clean monthly.
- Low-usage seasons: Clean before storing or restarting the unit.
Set a calendar reminder to check the filter and coils regularly. A clean unit uses less energy, lasts longer, and keeps your home healthier.
Preventative Maintenance Tips
To minimize future coil buildup, follow these best practices:
- Replace the air filter regularly: A clean filter reduces the amount of dust reaching the coils.
- Keep the area around the unit clear: Allow at least 6–12 inches of space on all sides for proper airflow.
- Use a drain hose instead of the tank: Continuous drainage reduces the need to empty the tank and prevents overflow.
- Run the unit during dry periods: This prevents mold from growing inside when not in use.
- Schedule annual professional maintenance: A technician can check refrigerant levels, electrical connections, and overall performance.
Conclusion
Cleaning your dehumidifier coil is a simple yet powerful way to maintain efficiency, save energy, and protect your investment. By following this step-by-step guide, you can safely remove dirt, mold, and debris from the coils and keep your unit running at peak performance. Regular maintenance not only extends the life of your dehumidifier but also contributes to a healthier, more comfortable home environment.
Don’t wait until your unit starts struggling—make coil cleaning part of your seasonal home care routine. With the right tools and a little time, you’ll enjoy better air quality, lower energy bills, and peace of mind knowing your dehumidifier is working as it should.